最近把家里的旧服务器搬到出租屋里面来了,准备当服务器用来着,二十年前的老机器了。想着用微信hook的功能,所以选择的windows server。配置好一些环境之后开始配置docker环境除了一些问题。
启用Hyper-V和Containers功能
运行管理员权限powershell
Install-WindowsFeature -Name Hyper-V,Containers -IncludeAllSubFeature -IncludeManagementTools -Verbose配置安装源
Install-Module -Name DockerMsftProvider -Repository PSGallery -Verbose安装Docker
运行管理员权限powershell,国内安装可能会因为网络原因失败,可以尝试手动安装,如果按照成功这下面步骤不用进行了
Install-Package -Name docker -ProviderName DockerMsftProvider -Verbose下载文件
PS C:\Users\Administrator\Desktop> Invoke-WebRequest -UseBasicParsing -OutFile D:\docker-28.3.2.zip https://download.docker.com/win/static/stable/x86_64/docker-28.3.2.zip文件下载地址
https://download.docker.com/win/static/stable/x86_64/
配置系统环境变量Path
注册为系统服务
dockerd --register-service -H npipe:// -H tcp://0.0.0.0:2375 --config-file "D:\Env\docker\config\daemon.json"配置文件内容
D:\Env\docker\config\daemon.json
{
  "dns": ["114.114.114.114", "8.8.8.8"],
  "data-root":  "D:\\Env\\docker\\data",
  "registry-mirrors": ["https://registry.docker-cn.com"]
}
其他命令
设置Docker开机启动
Set-Service -Name docker -StartupType Automatic启动 Docker 服务
Start-Service docker重启 Docker 服务
Restart-Service Docker -Force停止 Docker 服务
Stop-Service Dockerdocker-compose下载
https://github.com/docker/compose/releases
1.下载适用于 Windows 的 docker-compose-Windows-x86_64.exe 文件。
2.将文件重命名为 docker-compose.exe 并移动到 Docker 安装目录(如 D:\Env\docker)
ps:安装完了我才发现,windows server 2019的docker不支持linux的容器,要想弄,还要一个wsl支持,或者升级机器配置。想想还是算了,直接换ubuntu 的server版了
]]>微信版本:3.9.12.45
账号:两个微信账号,大号用来发消息,小号用来测试
工具:微信、CE修改器、x64dbg

定位消息地址
选择微信进程

大号给小号发送消息,扫描类型选择字符串,数值填写消息内容

重复之上的步骤,不断重复,直到无法定位的时候(我这里有三个),一个个查看浏览器内存区域

找到带着wxid和xml格式的就是内存地址


x64dbg断点
记录一下当前的微信地址1B6555E11BD,关闭CE修改器,打开x64dbg,附加微信,按住alt+e选择wechatwin.dll

点进去,再内存窗口搜索刚才记录的地址

设置写入断点

此时微信大号给小号发送消息,查看堆栈信息

找到有个db的那个(这一步骤是再写入微信数据库之前定位call)

选择,右键“在反汇编中转到指定QWORD”

跳转之后,先取消上一个断点

然后针对跳转的位置,找到上一个call位置,在call处进行断点

发送消息,断点到了,查看RDI


在地址栏的第一个双击一下

这样我们可以得出
0x48 是 微信id
0x88 是 微信消息的内容
计算偏移
找到断点位置,复制文件偏移

然后打开计算器那个图标,用偏移地址+C00

得出结果250AEA7
验证结果
找到断点位置,复制地址

然后按住ALT+E,找到复制wechatwin.dll的基址

用计算器两者相减得出结果250AEA7

结果是对的,此时编写frida脚本
var wechatWin = Module.findBaseAddress("WeChatWin.dll");
if (!wechatWin) {
    console.error("WeChatWin.dll模块未找到!");
    throw new Error("模块未找到");
}
var hookAddress = wechatWin.add(0x250AEA7);
Interceptor.attach(hookAddress, {
    onEnter: function (args) {
        var timestamp = this.context.rdi.add(0x44).readInt();
        var wxid = this.context.rdi.add(0x48).readPointer().readUtf16String();
        var msg  = this.context.rdi.add(0x88).readPointer().readUtf16String();
        console.log("[++++] "+ timestamp +"    "+ wxid +"  :  "+msg)
    }
});

console.log("Hook已安装,等待接收消息...");
运行脚本
发送消息测试

certbot,用于申请ssl证书和自动续期
网站:https://certbot.eff.org
openssl,用于pem证书类型的转换
网站:https://slproweb.com/products/Win32OpenSSL.html
使用certbot申请ssl证书
certbot certonly --webroot -w D:\apache-tomcat-8.5.94\webapps\ROOT -d www.xxxx.com生成路径:
Saving debug log to C:\Certbot\log\letsencrypt.log
Requesting a certificate for www.sdxyjq.com

Successfully received certificate.
Certificate is saved at: C:\Certbot\live\www.xxxx.com-0002\fullchain.pem
Key is saved at:         C:\Certbot\live\www.xxxx.com-0002\privkey.pem
This certificate expires on 2025-02-11.
These files will be updated when the certificate renews.
Certbot has set up a scheduled task to automatically renew this certificate in the background.

---

If you like Certbot, please consider supporting our work by:

* Donating to ISRG / Let's Encrypt:   https://letsencrypt.org/donate
* Donating to EFF:                    https://eff.org/donate-le

---
证书转换并导出到相应路径
openssl pkcs12 -export -out D:\apache-tomcat-8.5.94\conf\cert\www.xxxx.com.pfx -inkey C:\Certbot\live\www.xxxx.com-0002\privkey.pem -in C:\Certbot\live\www.xxxx.com-0002\fullchain.pem -name tomcat设置密码(默认使用原密码):xxxx
重启tomcat
D:\apache-tomcat-8.5.94\bin 路径内
关闭shutdown.bat
打开startup.bat
注意: 这里有个小tips,运行这俩bat的时候必须去那个bin路径下面运行,别整花活,什么快捷方式和命令行,这样会无法检查到那些东西的。。。这玩意只会检查当前运行目录下的东西。
自动续订脚本
创建文件renew_certificates.bat
@echo off
cd C:\Certbot
certbot renew >> C:\Users\Administrator\Desktop\续订日志.log 2>&1
配置windows任务
win+r输入taskschd.msc,打开任务并设置添加ssl自动续订的任务,在每月的1号检查并续订ssl
]]>
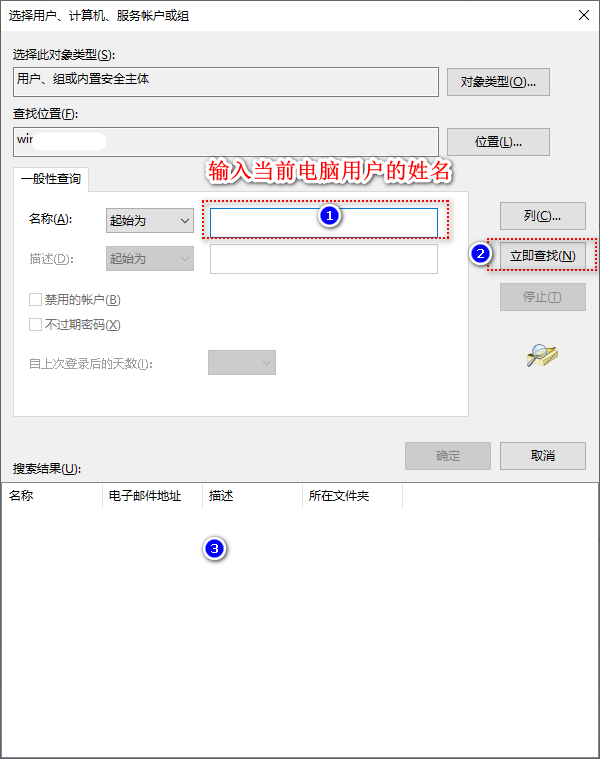
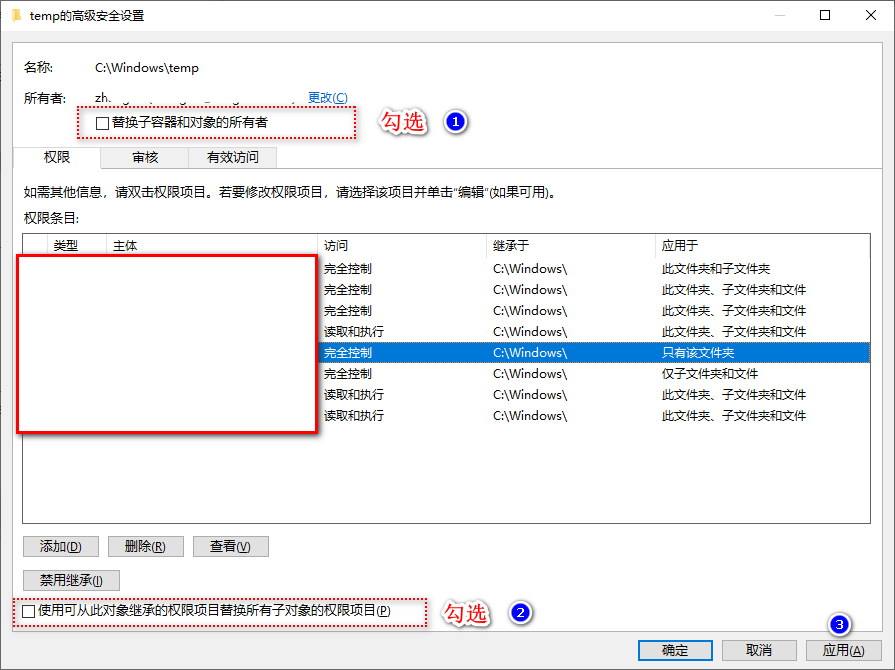
解决办法:
- 进入 C:\Windows
- 找到"temp"文件夹 ---- 右键“属性” --- “高级” --- “更改”

- 然后点击 “高级”
输入电脑当前用户的姓名,进行搜索
下载完成后,放到服务器指定路径,并开启cmd窗口进行命令行格式的运行。
启动
start nginx查看任务进程是否存在
tasklist /fi "imagename eq nginx.exe"重新加载
nginx -s reload快速停止
nginx -s stop简单配置:
首先正常启动是80端口,如果是阿里云服务器需要去安全组放行端口。
再然后是443端口,这里如果需要用到多个的话,我建议是加一个 ‘/’ 用来区分端口例如如下配置
#user  nobody;
worker_processes  1;

#error_log  logs/error.log;
#error_log  logs/error.log  notice;
#error_log  logs/error.log  info;

#pid        logs/nginx.pid;


events {
    worker_connections  1024;
}


http {
    include       mime.types;
    default_type  application/octet-stream;

    #log_format  main  '$remote_addr - $remote_user [$time_local] "$request" '
    #                  '$status $body_bytes_sent "$http_referer" '
    #                  '"$http_user_agent" "$http_x_forwarded_for"';

    #access_log  logs/access.log  main;

    sendfile        on;
    #tcp_nopush     on;

    #keepalive_timeout  0;
    keepalive_timeout  65;

    #gzip  on;

    server {
        listen       80;
        server_name  localhost;

        #charset koi8-r;

        #access_log  logs/host.access.log  main;

        location / {
            root   html;
            index  index.html index.htm;
        }

        #error_page  404              /404.html;

        # redirect server error pages to the static page /50x.html
        #
        error_page   500 502 503 504  /50x.html;
        location = /50x.html {
            root   html;
        }


    }

    #server {
    #    listen       8000;
    #    listen       somename:8080;
    #    server_name  somename  alias  another.alias;

    #    location / {
    #        root   html;
    #        index  index.html index.htm;
    #    }
    #}

   server {
        listen       443 ssl;
        server_name  47.121.199.144;

        ssl_certificate         C:/dev/nginx/nginx-1.26.2/nginx-1.26.2/443/certificate.crt;
        ssl_certificate_key     C:/dev/nginx/nginx-1.26.2/nginx-1.26.2/443/private.key;

        ssl_session_cache    shared:SSL:1m;
        ssl_session_timeout  5m;

        ssl_ciphers  HIGH:!aNULL:!MD5;
        ssl_prefer_server_ciphers  on;

        location /8081/ {
            proxy_pass http://47.121.199.144:8081/;
            proxy_set_header Host $host;
            proxy_set_header X-Real-IP $remote_addr;
            proxy_set_header X-Forwarded-For $proxy_add_x_forwarded_for;
            proxy_set_header X-Forwarded-Proto $scheme;
        }
    }
}
其中这里的意思就是
 location /8081/ {
            proxy_pass http://47.121.199.144:8081/;
            proxy_set_header Host $host;
            proxy_set_header X-Real-IP $remote_addr;
            proxy_set_header X-Forwarded-For $proxy_add_x_forwarded_for;
            proxy_set_header X-Forwarded-Proto $scheme;
}将http://47.121.199.144:8081/这个网址指向https://47.121.199.144/8081/
注意:
1.在这里需要注意C:/dev/nginx/nginx-1.26.2/nginx-1.26.2/443/certificate.crt;的/ 是向右的。路径使用双反斜杠(\)或正斜杠(/)
2.在与zerossl.com交互的时候,涉及到地址验证的问题,其中需要创建.well-known文件夹,如果是简单的windows环境是无法创建的,会提示你“必须键入文件名”,这时候需要mkdir创建了,即mkdir .well-known
在 Windows 上运行 Stanford CoreNLP 服务的步骤如下:
1. 下载 Stanford CoreNLP
- 访问 Stanford CoreNLP 的下载页面。
- 下载最新的
stanford-corenlp-full压缩包文件。 - 解压该文件到一个合适的目录,例如
C:\stanford-corenlp-full-2023-06-18。
2. 启动 Stanford CoreNLP 服务器
你可以通过命令行启动 CoreNLP 服务器,确保你已经安装并配置好了 Java 环境。
打开命令提示符(CMD),导航到解压的 CoreNLP 目录:
cd C:\stanford-corenlp-full-2023-06-18启动服务器:
java -mx4g -cp "*" edu.stanford.nlp.pipeline.StanfordCoreNLPServer -port 9000 -timeout 15000这里,
-mx4g代表分配 4GB 内存给服务器,你可以根据实际需求调整此值。默认服务器会在http://localhost:9000运行。
3. 测试服务器
- 在浏览器中访问
http://localhost:9000,查看是否服务器已经启动并运行。
或者你可以通过发送 HTTP 请求来测试,例如使用 curl:
curl --data 'The quick brown fox jumps over the lazy dog.' 'http://localhost:9000/?properties={"annotators":"tokenize,ssplit,pos,lemma,ner,parse,depparse","outputFormat":"json"}'成功后,服务器会返回 NLP 分析结果。
4. 常见问题
- 如果遇到内存不足错误,可以尝试增加
-mx后的内存值,比如-mx8g。 - 服务器默认在 9000 端口运行。如果此端口被占用,你可以使用
-port参数指定其他端口。
这样,就可以在 Windows 环境下运行 Stanford CoreNLP 服务了。
]]>现在简单记录一下frp的简单使用
frp是什么
简单地说,frp就是一个反向代理软件,它体积轻量但功能很强大,可以使处于内网或防火墙后的设备对外界提供服务,它支持HTTP、TCP、UDP等众多协议。我们今天仅讨论TCP和UDP相关的内容。
项目地址:https://github.com/fatedier/frp
其中frps是服务端的配置,frpc是客户端的配置,每个都有三个文件,服务端只保留服务端的三个,客户端只保留客户端的三个即可。
Windows客户端启动方式,打开当前文件夹,输入以下命令
frpc -c ./frpc.iniLinux服务端启动方式,打开当前文件夹,输入以下命令
./frps -c ./frps.ini通过ip穿透
这种情况只需要拥有一台服务器就可以了。
服务端配置
[common]
bind_port = 6001
dashboard_port = 6002
token = 12345678
dashboard_user = admin
dashboard_pwd = admin
vhost_http_port = 6003
现在解释一下服务端配置的一些
bind_port: FRP 服务端或客户端绑定的端口号。服务端用于接收来自客户端的请求,客户端用于连接服务端。(可自定义)dashboard_port: FRP 的仪表盘(Dashboard)端口号。通过这个端口,您可以使用 Web 界面来查看 FRP 的状态和运行情况。(可自定义)token: FRP 鉴权的 Token。Token 是客户端连接到服务端时进行验证的凭据,用于确保只有具有正确 Token 的客户端可以连接到服务端。(可自定义)dashboard_user: FRP 仪表盘v的用户名。(可自定义)dashboard_pwd: FRP 仪表盘的密码。(可自定义)vhost_http_port: 虚拟主机 HTTP 端口。如果您启用了虚拟主机功能,这个端口将用于 HTTP 请求。(可自定义)
当然这里我之打开了http端口,如果你还想的话可以打开https,socket,tcp等各种链接的端口,这些都是可以自定义的
客户端配置
[common]
server_addr = 101.42.5.22
server_port = 6001
token = 12345678

[web]
type = http
local_ip = 127.0.0.1
local_port = 4000
remote_port = 6003
custom_domains = 101.42.5.22[common]部分:server_addr: FRP 服务端的 IP 地址或域名。server_port: FRP 服务端的端口号。token: FRP 鉴权的 Token,与服务端配置中的 Token 要一致。
[web]部分:type: 代理类型,这里是 http 类型,用于配置 HTTP 代理。local_ip: 要代理的本地 IP 地址,这里设置为127.0.0.1表示代理本地。local_port: 要代理的本地端口号,这里设置为4000。remote_port: 服务端映射的端口号,客户端请求该端口时将被代理到本地的local_port上。custom_domains: 自定义域名,这里设置为101.42.5.22。
其中[web]可以自定义但是要注意名称不能重复
通过域名穿透
这种情况需要配置好域名,服务器的解析,做好解析后才能开始配置。一些服务器提供厂商的还需要再控制台释放对应端口(比如腾讯云,阿里云)。
服务端配置
[common]
bind_port = 6001
dashboard_port = 6002
token = 12345678
dashboard_user = admin
dashboard_pwd = admin
vhost_http_port = 6003
subdomain_host = twoitmen.club相同配置不做赘述,这里多出来一个subdomain_host,在这里subdomain_host的作用是自定义子域名的主机名。比如我的服务器绑定的域名是twoitmen.club(我解析的时候喜欢用*做解析,一次配置,随便使用)。那我我在这里填写twoitmen.club就可以了。
客户端配置
[common]
server_addr = 101.42.5.22
server_port = 6001
token = 12345678

[web]
type = http
local_ip = 127.0.0.1
local_port = 4000
remote_port = 6003
subdomain = frp相同配置不做赘述,这里多出来一个subdomain,在这里subdomain的作用是子域名,用于标识代理服务。也就是说,我要访问frp.twoitmen.club:6003就是我穿透完毕后的域名地址。
nginx配置
在这里多出来一个nginx配置,它是用来反向代理的,就是省略后面端口号的书写
通过域名穿透的方式的nginx配置
#user  nobody;
worker_processes  1;
events {
    worker_connections  1024;
}
http {
    include       mime.types;
    default_type  application/octet-stream;
    sendfile        on;
    include /home/conf/*.conf;
    keepalive_timeout  65;
    server {
        listen       80;
        server_name  localhost;
        location / {
            root   html;
            index  index.html index.htm;
        }

      location /memos {
        proxy_pass  http://101.42.5.22:6060; # 转发规则
      }

        error_page   500 502 503 504  /50x.html;
        location = /50x.html {
            root   html;
        }
    }
    server {
        listen       80;
        server_name  frp.twoitmen.club;
            location / {
            proxy_pass http://frp.twoitmen.club:6003/;
            proxy_set_header Host $host;
            proxy_set_header X-Real-IP $remote_addr;
        }
     }
}
在这里只是多出来一个server,这里简单讲述一下多出来的server配置
listen 80;: 监听来自端口 80 的 HTTP 请求。server_name frp.twoitmen.club;: 指定该服务器块的域名为frp.twoitmen.club。location / { ... }: 这是一个代理规则,它会将来自/路径的请求转发到http://frp.twoitmen.club:6003/上。proxy_pass http://frp.twoitmen.club:6003/;: 它指定了要转发到的目标地址为http://frp.twoitmen.club:6003/。proxy_set_header Host $host;: 在转发请求时,设置了Host请求头为原始请求的主机名。proxy_set_header X-Real-IP $remote_addr;: 在转发请求时,设置了X-Real-IP请求头为原始请求的客户端 IP 地址。
将frps命令写入system
输入命令
vim /lib/systemd/system/frps.service写入配置
[Unit]
Description=frps service
After=network.target syslog.target
Wants=network.target

[Service]
Type=simple
# 启动服务的命令(此处写你的frps的实际安装目录)
# ExecStart=/your/path/frps -c /your/path/frps.ini
ExecStart=/home/zhang/frpServer/frps -c /home/zhang/frpServerfrps.ini

[Install]
WantedBy=multi-user.target因为windows有任务计划程序的原因,所以我们只需要写好bash脚本就可以。
bash
:: 配置数据库用户
SET DB_USER=root

:: 配置数据库密码
SET DB_PASSWORD=root123

:: 配置备份的数据库名称
SET DB_NAME=security_enterprise

:: 配置备份的文件路径
SET SAVE_PATH=D:\MySqlBackup

:: 配置mysqldump的路径,有空格的要加上双引号
SET MYSQL_DUMP_PATH=D:\Environment\mysql-5.7.40\bin\mysqldump.exe

:: 开始工作
:: 跳转到工作目录下
%SAVE_PATH:~0,2%
cd %SAVE_PATH%
:: 设置变量:备份文件名
SET BAK_FILE=%SAVE_PATH%\security_enterprise_bak_%date:~0,4%_%date:~5,2%_%date:~8,2%.sql
:: 开始做备份
%MYSQL_DUMP_PATH% -u%DB_USER% -p%DB_PASSWORD% %DB_NAME%>%BAK_FILE%
在里面很清楚了,在此不做赘述。
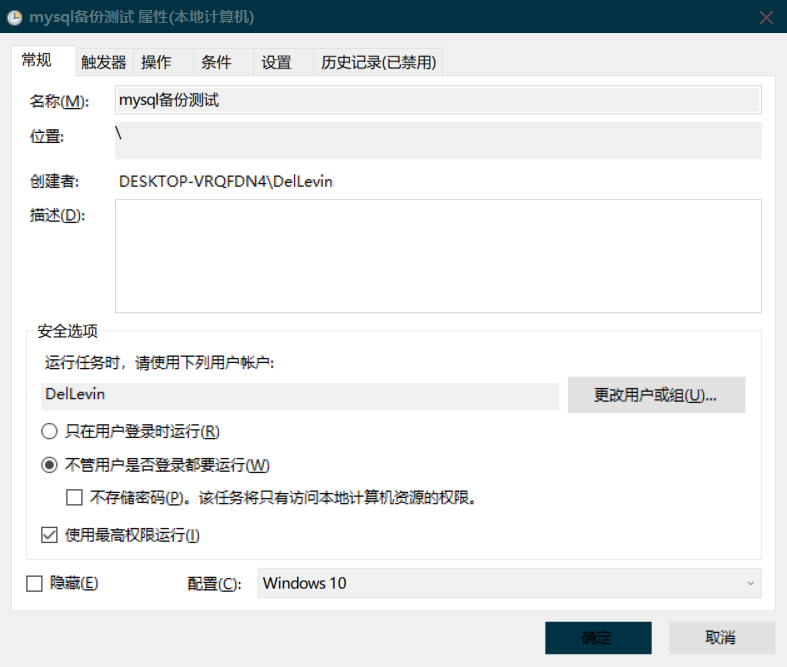
windows任务计划程序
设置名称描述以及安全选项
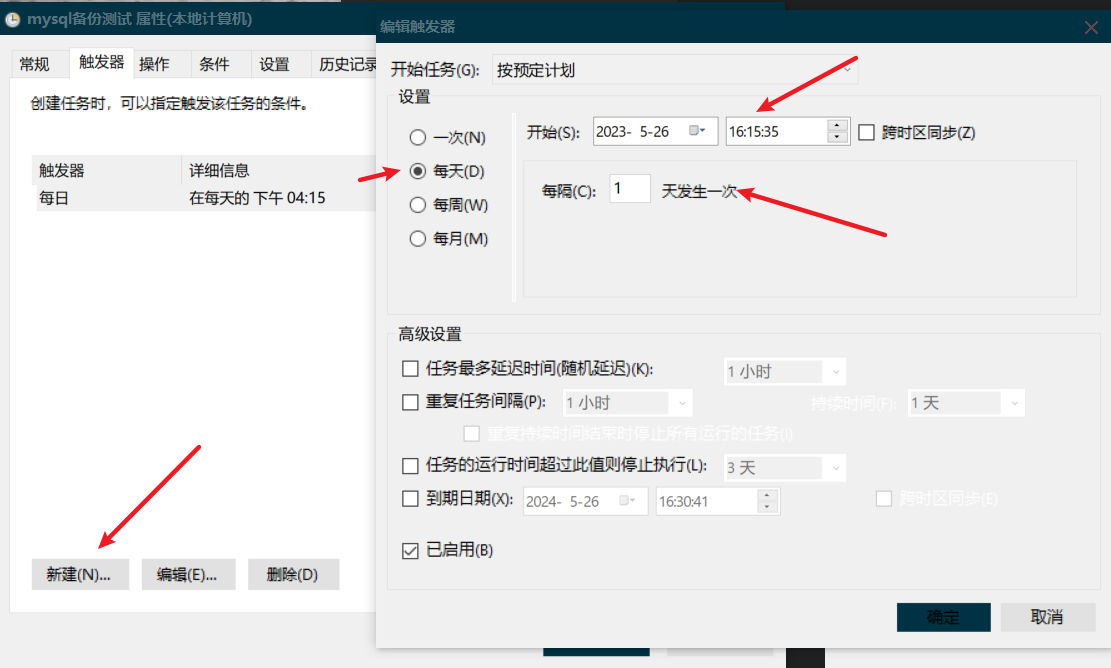
设置触发器
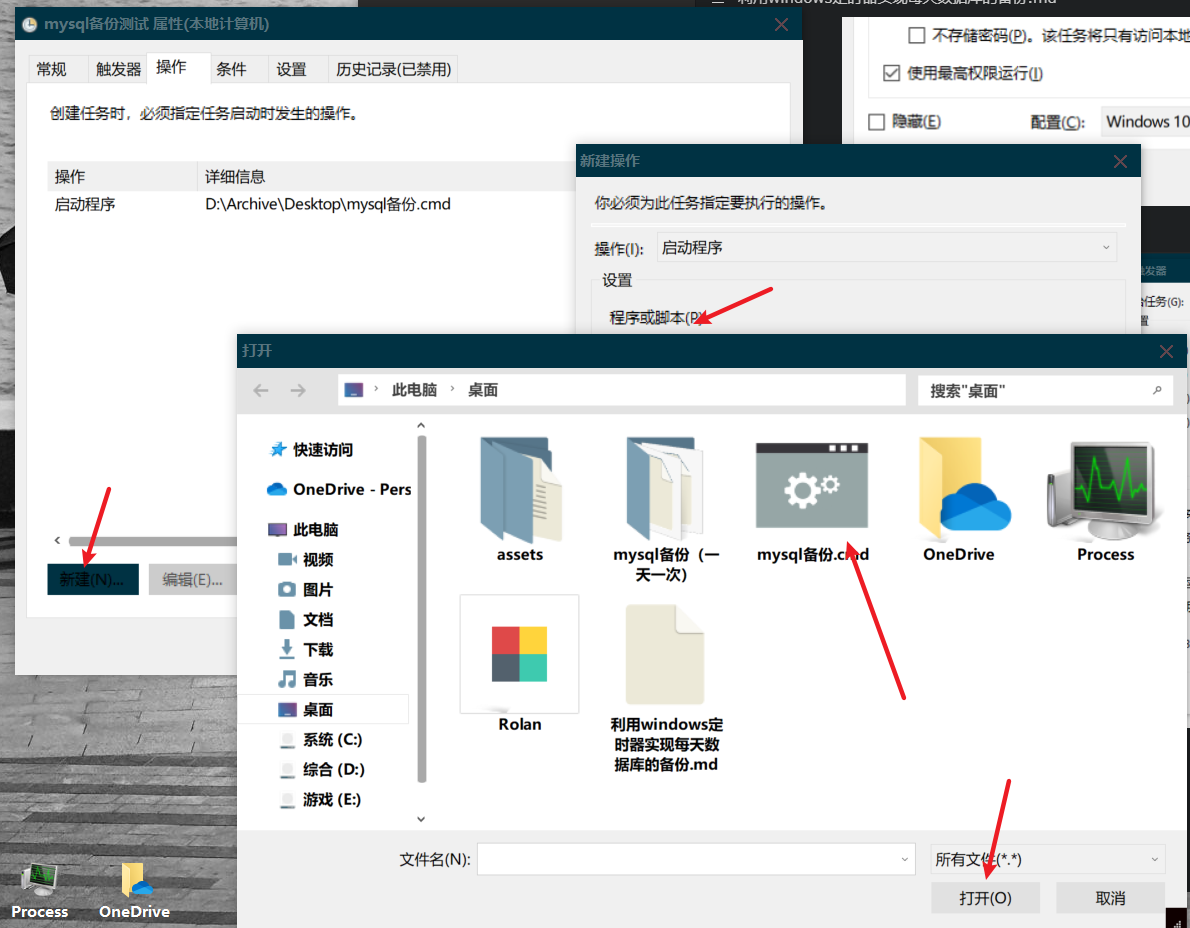
设置操作
设置一下意外情况
这里是防止备份失败进行的容错处理,可以做此步骤
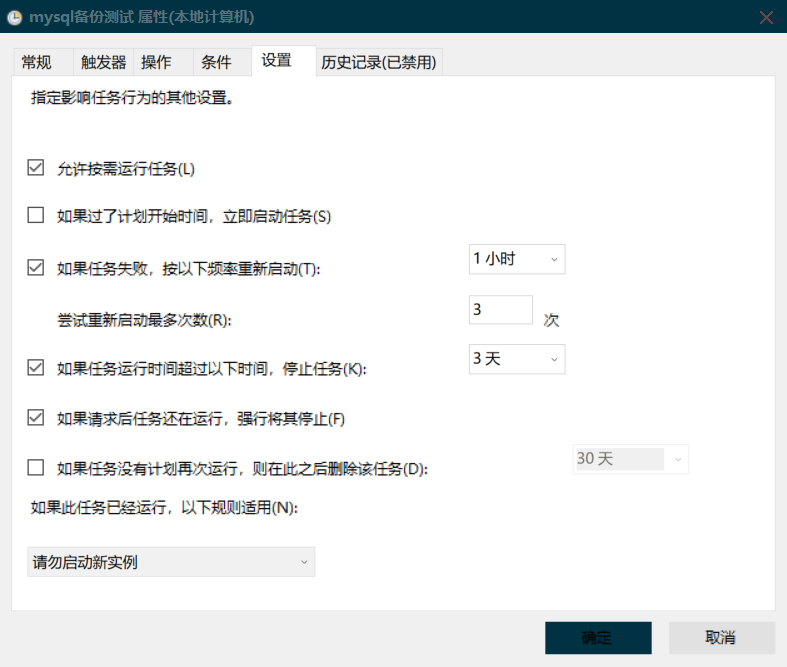
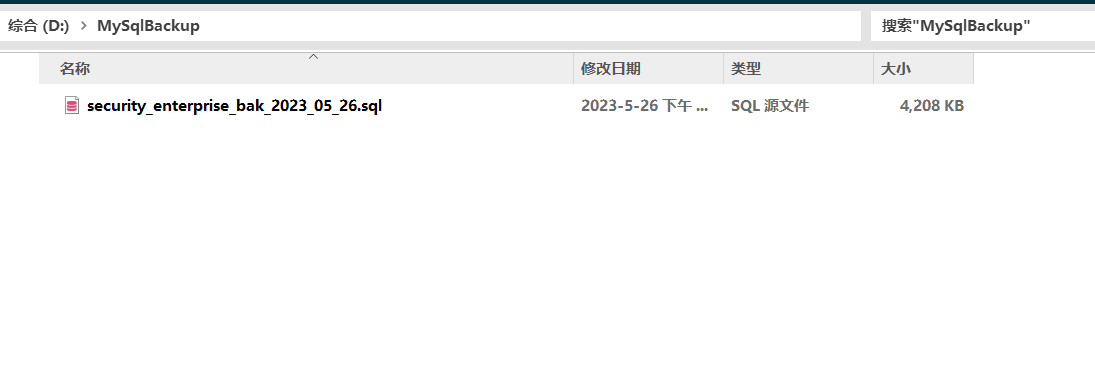
经过一系列的设置,就会每天在固定时间在我的D:\MySqlBackup目录下面生成一个备份文件,防止出错了。
@echo off
rem 提供Windows下nginx的启动,重启,关闭功能

echo ==================begin========================

cls
::ngxin 所在的盘符
set NGINX_PATH=D:

::nginx 所在目录
set NGINX_DIR=D:\Environment\nginx\
color 0c
TITLE Nginx 管理程序增强版

CLS

:MENU

echo. _nginx 进程list:
::tasklist|findstr /i "nginx.exe"
tasklist /fi "imagename eq nginx.exe"

echo.
::*****************************
echo.
    echo.  [1] 启动Nginx
    echo.  [2] 关闭Nginx
    echo.  [3] 重启Nginx
    echo.  [4] 刷新控制台
    echo.  [5] 重新加载Nginx配置文件
    echo.  [6] 检查测试nginx配置文件
    echo.  [7] 查看nginx version
    echo.  [0] 退 出
echo.

echo.请输入选择的序号:
set /p ID=
    IF "%id%"=="1" GOTO start
    IF "%id%"=="2" GOTO stop
    IF "%id%"=="3" GOTO restart
    IF "%id%"=="4" GOTO MENU
    IF "%id%"=="5" GOTO reloadConf
    IF "%id%"=="6" GOTO checkConf
    IF "%id%"=="7" GOTO showVersion
    IF "%id%"=="0" EXIT
PAUSE

::********************
::启动
:start
    call :startNginx
    GOTO MENU

::停止
:stop
    call :shutdownNginx
    GOTO MENU

::重启
:restart
    call :shutdownNginx
    call :startNginx
    GOTO MENU

::检查测试配置文件
:checkConf
    call :checkConfNginx
    GOTO MENU

::重新加载Nginx配置文件
:reloadConf
    call :checkConfNginx
    call :reloadConfNginx
    GOTO MENU

::显示nginx版本
:showVersion
    call :showVersionNginx
    GOTO MENU


::***************
::底层
::***************
:shutdownNginx
    echo.
    echo.关闭Nginx......
    taskkill /F /IM nginx.exe > nul
    echo.OK,关闭所有nginx 进程
    goto :eof

:startNginx
    echo.
    echo.启动Nginx......
    IF NOT EXIST "%NGINX_DIR%nginx.exe" (
        echo "%NGINX_DIR%nginx.exe"不存在
        goto :eof
     )

    %NGINX_PATH%
    cd "%NGINX_DIR%"

    IF EXIST "%NGINX_DIR%nginx.exe" (
        echo "start '' nginx.exe"
        start "" nginx.exe
    )
    echo.OK
    goto :eof


:checkConfNginx
    echo.
    echo.检查测试 nginx 配置文件......
    IF NOT EXIST "%NGINX_DIR%nginx.exe" (
        echo "%NGINX_DIR%nginx.exe"不存在
        goto :eof
     )

    %NGINX_PATH%
    cd "%NGINX_DIR%"
    nginx -t -c conf/nginx.conf

    goto :eof

:: 重新加载 nginx 配置文件
:reloadConfNginx
    echo.
    echo.重新加载 nginx 配置文件......
    IF NOT EXIST "%NGINX_DIR%nginx.exe" (
        echo "%NGINX_DIR%nginx.exe"不存在
        goto :eof
     )

    %NGINX_PATH%
    cd "%NGINX_DIR%"
    nginx -s reload

    goto :eof

::显示nginx版本
:showVersionNginx
    echo.
    %NGINX_PATH%
    cd "%NGINX_DIR%"
    nginx -V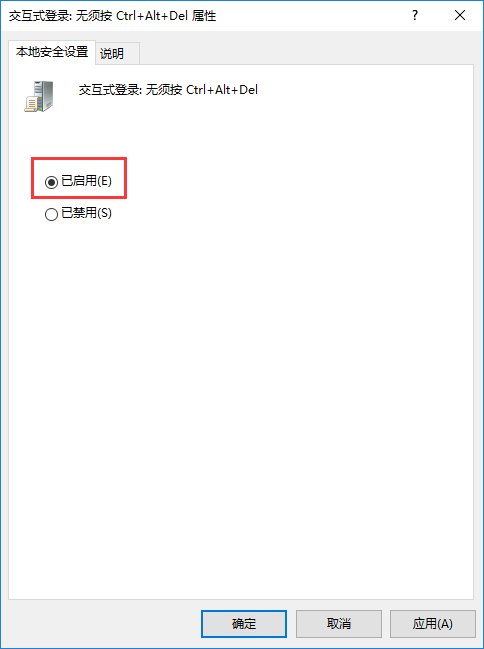
goto :eof- 按 Win + R 组合键打开运行,输入:gpedit.msc 命令,确定或回车,打开本地组策略编辑器
- 在本地组策略编辑器中,依次展开:计算机配置 - Windows 设置 - 安全设置 - 本地策略 - 安全选项,在右侧找到并双击打开交互式:无须按Ctrl+Alt+Del;
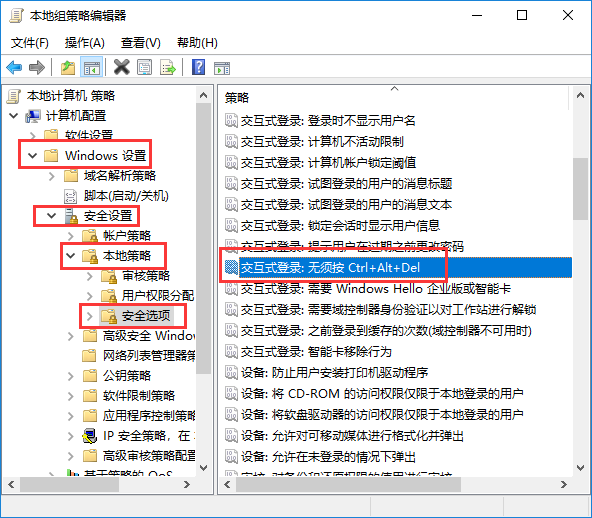
- 交互式登录:无须按Ctrl+Alt+Del属性创空中,选择已启用;