import subprocess
from datetime import datetime, timedelta, timezone
import requests
from datetime import datetime
from apscheduler.schedulers.blocking import BlockingScheduler

scheduler = BlockingScheduler()

# 发送通知请求
def send_msg_to_gotify(title, msg):
    url = "http://152.136.153.72:8385/message"
    params = {"token": "AI.53prwavAZsoC"}
    current_time = datetime.now()
    # 表单数据
    data = {
        "title": title,
        "message": msg,
        "priority": "0"
    }
    try:
        response = requests.post(
            url,
            params=params,
            data=data
        )
        print("Response Body:", response.text)
    except requests.exceptions.RequestException as e:
        print("请求失败:", e)

def check_ssl_certificate_expiration(web_site, out_date):
    # 执行 openssl 命令获取证书信息
    try:
        result = subprocess.run(
            ["openssl", "x509", "-in", "fullchain.pem", "-noout", "-dates"],
            capture_output=True,
            text=True,
            check=True,
            cwd=f"C:\\Certbot\\live\\{web_site}"
        )
    except subprocess.CalledProcessError as e:
        print("执行 openssl 命令失败:", e)
        return

    # 解析输出,提取 notAfter 日期
    output = result.stdout
    not_after_str = None
    for line in output.splitlines():
        if line.startswith("notAfter="):
            not_after_str = line.split("=", 1)[1].strip()
            break

    if not not_after_str:
        print("未找到 notAfter 信息")
        return

    # 解析日期字符串为 datetime 对象(使用 GMT 时间)
    try:
        date_format = "%b %d %H:%M:%S %Y GMT"
        not_after_date = datetime.strptime(not_after_str, date_format).replace(tzinfo=timezone.utc)
    except ValueError as e:
        print("日期解析失败:", e)
        return

    # 获取当前 UTC 时间
    current_date = datetime.now(timezone.utc)

    # 计算时间差
    delta = not_after_date - current_date

    # 判断是否在 15 天内且未过期
    if 0 <= delta.days <= out_date:
        print(f"⚠️ SSL 证书({web_site})将在 {delta.days} 天后过期,请及时续期!")
        send_msg_to_gotify('SSL即将过期', f'SSL 证书({web_site})将在 {delta.days} 天后过期,请及时更新并重启nginx服务')
    elif delta.days < 0:
        print(f"❌ SSL 证书({web_site})已过期!")
        send_msg_to_gotify('SSL即将过期', f'SSL 证书({web_site})已过期,请及时更新并重启nginx服务')
    else:
        print(f"✅ SSL 证书({web_site})有效期超过 {out_date} 天,无需处理。")


# 执行检查
@scheduler.scheduled_job('cron', hour=8, minute=30, misfire_grace_time=3600)
def tick():
    check_ssl_certificate_expiration('cx.sdasinfo.org.cn', 15)

try:
    scheduler.start()
    print('定时任务成功执行')
except Exception as e:
    scheduler.shutdown()
    print('定时任务执行失败')
finally:
exit()简单的网站都是一套的逻辑爬虫,大家可以参考一下。有兴趣的话帮忙点个start支持一下
前后端系统以及数据库
https://gitee.com/wonder19991209/mohurd\_search\_sys
爬虫脚本
]]>2.检索当日的公告信息,查看是否有科技创新企业,如果有则提醒通知(提醒未写,简单完善数据)
取的关键词模糊搜索+排除词排除掉无关条目,来查找响应数据
检索是否有科技创新企业的公告/通知
# 检查当日数据是否有科创企业名录

import re
import time
import pymysql
import requests
from gxt_spider import get_industry
from kjt_spider import get_sci_kjt
from sdszf_spider import get_sci_sdszf
from jinja2 import Template
import json

 def connect_to_database():
    connection = pymysql.connect(
         host='127.0.0.1',
         user='root',
         password='123456',
        database='my_database_test',
        charset='utf8mb4',
         cursorclass=pymysql.cursors.DictCursor
     )
     return connection


def query_today_kc_enterprises():
    keywords = [
        "科技型中小企业",
        "高新技术企业",
        "众创空间",
        "科技领军企业",
        "技术先进型服务企业",
        "技术创新示范企业",
        "专精特新",
        "科技企业",
        "瞪羚",
        "独角兽",
        "科技小巨人企业",
        '小巨人']
    not_contain_keywords = ["取消","组织申报","认定和复核","申报","补助名单","绩效评价"]
    sql = build_sql_query(keywords, not_contain_keywords)

    connection = connect_to_database()
    try:
        with connection.cursor() as cursor:
            cursor.execute(sql)
            results = cursor.fetchall()

            return {
                "total": len(results),
                "list": results
            }
    finally:
        connection.close()

def build_sql_query(keywords, not_contain_keywords):
    like_conditions = " OR ".join([f"title LIKE '%{keyword}%'" for keyword in keywords])
    not_like_conditions = " and ".join([f"title NOT LIKE '%{not_contain_keyword}%'" for not_contain_keyword in not_contain_keywords])
    sql = f"""
        SELECT
        CASE type
            WHEN '1' THEN '山东省科学技术厅'
            WHEN '2' THEN '山东省工业和技术化厅'
            WHEN '3' THEN '山东省人民政府'
            ELSE '未知类型'
        END AS type_name,date,title,url FROM `sci_spider`
        WHERE ({like_conditions})
        AND ({not_like_conditions})
        AND DATE(create_date) = DATE(NOW())
    """
    return sql


def mail_sender(content):
    import smtplib
    from email.mime.text import MIMEText
    from email.header import Header
    # 第三方 SMTP 服务
    mail_host = "smtp.163.com"  # 设置服务器
    mail_user = "18631839859@163.com"  # 用户名
    mail_pass = "GENGs7dM45TJDH6y"  # 口令
    sender = '18631839859@163.com'
    receivers = ['wonder1999@126.com']  # 接收邮件,可设置为你的QQ邮箱或者其他邮箱

    # message = MIMEText(content, 'plain', 'utf-8')
    message = MIMEText(content, 'html', 'utf-8')
    message['From'] = Header("科技型中小企业通知", 'utf-8')
    message['To'] = Header("科技型中小企业", 'utf-8')

    subject = '科技型中小企业通知'
    message['Subject'] = Header(subject, 'utf-8')

    try:
        smtpObj = smtplib.SMTP()
        smtpObj.connect(mail_host, 25)  # 25 为 SMTP 端口号
        smtpObj.login(mail_user, mail_pass)
        smtpObj.sendmail(sender, receivers, message.as_string())
        print("邮件发送成功")
    except smtplib.SMTPException:
        print("Error: 无法发送邮件")


def wx_web_hook(data):
    """
    通过企业微信Webhook发送Markdown格式的消息
    :param data: 包含通知数据的字典,结构应包含'total'和'list'键
    :return: None
    """
    # Webhook地址(请替换为你的实际Key)
    webhook_url = "https://qyapi.weixin.qq.com/cgi-bin/webhook/send?key=ef84945d-2247-4f09-ac0b-be7a6607c24e"

    # 构造Markdown内容
    content = f"**找到 {data['total']} 条疑似符合条件的记录:**\n"
    for row in data['list']:
        content += (
            f"- [{row['title']}]({row['url']}) "
            f"<font color=\"comment\">{row['date']}</font> "
            f"<font color=\"warning\">{row['type_name']}</font>\n"
        )

    # 构建请求体
    payload = {
        "msgtype": "markdown",
        "markdown": {
            "content": content
        }
    }
    # 发送请求并处理响应
    try:
        response = requests.post(webhook_url, json=payload)
        response.raise_for_status()  # 抛出HTTP错误
        result = response.json()

        if result.get("errcode") == 0:
            print("✅ 消息发送成功")
        else:
            print(f"❌ 消息发送失败: {result.get('errmsg')}")

    except requests.exceptions.RequestException as e:
        print(f"⚠️ 请求异常: {e}")

if __name__ == '__main__':
    get_industry(1, 2)
    get_sci_kjt(1, 1)
    get_sci_sdszf(1, 3)
    data = query_today_kc_enterprises()
    title = f"找到 {data['total']} 条疑似符合条件的记录:"
    for row in data['list']:
        print(row)

    if data['total'] > 0:
        wx_web_hook(data)
        # mail_sender('测试消息')
工信厅爬虫
import re
import time
import pymysql
import requests


# 数据库链接
def connect_to_database():
    connection = pymysql.connect(
        host='127.0.0.1',
        user='root',
        password='123456',
        database='my_database_test',
        charset='utf8mb4',
        cursorclass=pymysql.cursors.DictCursor
    )
    return connection


def find_new_date():
    connection = connect_to_database()
    try:
        with connection.cursor() as cursor:
            sql = "SELECT date FROM `sci_spider` WHERE type = '2' ORDER BY DATE(date) DESC LIMIT 0,1"
            cursor.execute(sql)
            results = cursor.fetchall()
            return results[0]['date']
    except Exception as e:
        return ''
        connection.close()
    finally:
        connection.close()


def get_industry(page_num, type):
    url = (f'http://gxt.shandong.gov.cn/col/col15201/index.html?uid=586830&pageNum={page_num}')

    user_Agent = "Mozilla/5.0 (Windows NT 10.0; Win64; x64) AppleWebKit/537.36 (KHTML, like Gecko) Chrome/105.0.0.0 Safari/537.36"
    headers = {
        "Referer": None,
        "User-Agent": user_Agent
    }
    while True:
        try:
            response = requests.get(url=url, headers=headers)
            response.encoding = 'utf-8'
            response = response.text
            break
        except:
            print("请求失败,尝试睡眠一会(半小时)")
            sleep_time = 60 * 30
            time.sleep(sleep_time)
            print("睡眠结束,继续运行...")
            continue

    da = re.findall(r'<div class="bottom">            <span>                (.*?)            </span>', response)
    in_url = re.findall(r'target="_blank" href="(.*?)">', response)
    content = re.findall(r'<a title="(.*?)" target="_blank"', response)

    for i in range(0, len(da)):
        print(str(i+1) + ' : ' + da[i][0:10] + ' : '+content[i]+ ' : ' + in_url[i])

    if len(da)*2 != len(in_url) or len(da)*2 != len(content):
        print("数据不完整,跳过插入")
        return

    new_date = find_new_date()
    if not new_date or new_date == '':
        new_date = '1970-01-01'  # 默认最小日期

    connection = connect_to_database()
    try:
        with connection.cursor() as cursor:
            sql = """
               INSERT INTO `my_database_test`.`sci_spider`
               (`title`, `url`, `date`, `type`, `create_date`)
               VALUES (%s, %s, %s, %s, NOW())
               """
            count = 0
            for i in range(len(da)):
                if da[i][0:10] > new_date:
                    count = count + 1
                    cursor.execute(sql, (content[i], in_url[i], da[i][0:10], type))

        connection.commit()
        print(f"已成功插入 {count} 条数据")
    except Exception as e:
        print(f"插入数据失败: {e}")
        connection.rollback()
    finally:
        connection.close()

if __name__ == '__main__':
    get_industry(1, 2)
科技厅爬虫
import re
import time
import pymysql
import requests


def connect_to_database():
    connection = pymysql.connect(
        host='127.0.0.1',
        user='root',
        password='123456',
        database='my_database_test',
        charset='utf8mb4',
        cursorclass=pymysql.cursors.DictCursor
    )
    return connection


def find_new_date():
    connection = connect_to_database()
    try:
        with connection.cursor() as cursor:
            sql = "SELECT date FROM `sci_spider` WHERE type = '1' ORDER BY DATE(date) DESC LIMIT 0,1"
            cursor.execute(sql)
            results = cursor.fetchall()
            return results[0]['date']
    except Exception as e:
        return ''
        connection.close()
    finally:
        connection.close()


def get_sci_kjt(page_num, type):
    url = (f'http://kjt.shandong.gov.cn/col/col13360/index.html?uid=85651&pageNum={page_num}')
    user_Agent = "Mozilla/5.0 (Windows NT 10.0; Win64; x64) AppleWebKit/537.36 (KHTML, like Gecko) Chrome/105.0.0.0 Safari/537.36"
    headers = {
        "Referer": None,
        "User-Agent": user_Agent
    }
    while True:
        try:
            response = requests.get(url=url, headers=headers)
            response.encoding = 'utf-8'
            response = response.text
            break
        except:
            print("请求失败,尝试睡眠一会(半小时)")
            sleep_time = 60 * 30
            time.sleep(sleep_time)
            print("睡眠结束,继续运行...")
            continue

    da = re.findall(r'<span class="pull-right">(.*?)</span>', response)
    sci_url = re.findall(r'href="(.*?)" class="ellipsis-line-clamp">', response)
    content = re.findall(r'<s></s>(.*?)</a></li>', response)

    for i in range(0, len(da)):
        print(str(i+1) + ' : ' + da[i][0:10] + ' : '+content[i]+ ' : ' + sci_url[i])

    if len(da) != len(sci_url) or len(da) != len(content):
        print("数据不完整,跳过插入")
        return

    new_date = find_new_date()
    if not new_date or new_date == '':
        new_date = '1970-01-01'  # 默认最小日期

    connection = connect_to_database()
    try:
        with connection.cursor() as cursor:
            sql = """
            INSERT INTO `my_database_test`.`sci_spider`
            (`title`, `url`, `date`, `type`, `create_date`)
            VALUES (%s, %s, %s, %s, NOW())
            """
            count = 0
            for i in range(len(da)):
                if da[i] > new_date:
                    count = count + 1
                    cursor.execute(sql, (content[i], sci_url[i], da[i], type))

        connection.commit()
        print(f"已成功插入 {count} 条数据")
    except Exception as e:
        print(f"插入数据失败: {e}")
        connection.rollback()
    finally:
        connection.close()


if __name__ == '__main__':
    get_sci_kjt(1, 1)
山东省人民政府爬虫
import re
import time
import pymysql
import requests


def connect_to_database():
    connection = pymysql.connect(
        host='127.0.0.1',
        user='root',
        password='123456',
        database='my_database_test',
        charset='utf8mb4',
        cursorclass=pymysql.cursors.DictCursor
    )
    return connection


def find_new_date():
    connection = connect_to_database()
    try:
        with connection.cursor() as cursor:
            sql = "SELECT date FROM `sci_spider` WHERE type = '3' ORDER BY DATE(date) DESC LIMIT 0,1"
            cursor.execute(sql)
            results = cursor.fetchall()
            return results[0]['date']
    except Exception as e:
        return ''
        connection.close()
    finally:
        connection.close()


def get_sci_sdszf(page_num, type):
    url = (f'http://www.shandong.gov.cn/col/col94237/index.html?uid=633233&pageNum={page_num}')
    user_Agent = "Mozilla/5.0 (Windows NT 10.0; Win64; x64) AppleWebKit/537.36 (KHTML, like Gecko) Chrome/105.0.0.0 Safari/537.36"
    headers = {
        "Referer": None,
        "User-Agent": user_Agent
    }
    while True:
        try:
            response = requests.get(url=url, headers=headers)
            response.encoding = 'utf-8'
            response = response.text
            break
        except:
            print("请求失败,尝试睡眠一会(半小时)")
            sleep_time = 60 * 30
            time.sleep(sleep_time)
            print("睡眠结束,继续运行...")
            continue

    # 提取日期
    da = re.findall(r'<span>\s*(\d{4}-\d{2}-\d{2})\s*</span>', response)
    # 提取链接
    sci_url = re.findall(r'href="(.*?)"\s+target="_blank"\s+title="', response)
    # 提取标题(title 属性)
    content = re.findall(r'\s+target="_blank"\s+title="(.*?)"', response)
    # return
    print(len(da), len(sci_url), len(content))

    for i in range(0, len(da)):
        print(str(i+1) + ' : ' + da[i][0:10] + ' : '+content[i]+ ' : ' + sci_url[i])

    if len(da) != len(sci_url) or len(da) != len(content):
        print("数据不完整,跳过插入")
        return

    new_date = find_new_date()
    if not new_date or new_date == '':
        new_date = '1970-01-01'  # 默认最小日期

    connection = connect_to_database()
    try:
        with connection.cursor() as cursor:
            sql = """
            INSERT INTO `my_database_test`.`sci_spider`
            (`title`, `url`, `date`, `type`, `create_date`)
            VALUES (%s, %s, %s, %s, NOW())
            """
            count = 0
            for i in range(len(da)):
                if da[i] > new_date:
                    count = count + 1
                    cursor.execute(sql, (content[i], sci_url[i], da[i], type))

        connection.commit()
        print(f"已成功插入 {count} 条数据")
    except Exception as e:
        print(f"插入数据失败: {e}")
        connection.rollback()
    finally:
        connection.close()


if __name__ == '__main__':
get_sci_sdszf(1, 3)import flask
from flask import request, jsonify
from rescode.constants import ResponseCode
from spider.qiXinSpider import getQiXinCompInfo
'''
flask: web框架,通过flask提供的装饰器@server.route()将普通函数转换为服务
登录接口,需要传url、username、passwd
'''
# 创建一个服务,把当前这个python文件当做一个服务
server = flask.Flask(__name__)
# server.config['JSON_AS_ASCII'] = False
# @server.route()可以将普通函数转变为服务 登录接口的路径、请求方式
@server.route('/python-api/getCompTageFromQiXin', methods=['get', 'post'])
def getCompTageFromQiXin():
try:
# 获取通过url请求传参的数据
httpUrl = request.values.get('httpUrl')
if not httpUrl:
return jsonify(ResponseCode.PARAM_REQUIRED), 400
if 'www.sdxyjq.com:8080' in httpUrl:
httpUrl = httpUrl.replace('www.sdxyjq.com:8080', 'www.sdxyjq.com')
# 调用qiXinSpider.py里面的函数,需要传入
# chrome的路径 D:\\APP\\TestChrome2\\Application\\chrome.exe
# 信用金桥的http链接的url地址
comp_info = getQiXinCompInfo(httpUrl,'D:\\APP\\TestChrome2\\Application\\chrome.exe')
data = {
"httpUrl" : httpUrl,
"qiXinSpider" : comp_info,
"compName":comp_info['baseInfo']['ename']
}
return jsonify({**ResponseCode.SUCCESS, "data": data}), 200
except Exception as e:
# 统一异常捕获
return jsonify(ResponseCode.INTERNAL_ERROR), 500
@server.errorhandler(404)
def not_found(error):
return jsonify({ "code": 404, "message": "接口不存在" }), 404
@server.errorhandler(500)
def internal_error(error):
return jsonify(ResponseCode.INTERNAL_ERROR), 500
if __name__ == '__main__':
server.run(debug=True, port=8888, host='0.0.0.0')爬虫脚本
# -*- encoding:utf-8 -*-
import time
from selenium.webdriver.support.ui import WebDriverWait
from selenium.webdriver.chrome.options import Options
from seleniumwire import webdriver as wiredriver
from bs4 import BeautifulSoup
import requests
import gzip
import io
import json

# 初始化selenium
def initialize_driver(chromePath: str):
    # 配置 Chrome 浏览器选项
    chrome_options = Options()
    chrome_options.add_argument('--disable-gpu')  # 禁用 GPU 加速,确保拦截请求正常
    chrome_options.add_argument('--headless')  # 不打开浏览器
    chrome_options.add_argument('--ignore-certificate-errors')  # 忽略证书错误
    # 添加指定的浏览器路径
    chrome_path = chromePath
    chrome_options.binary_location = chrome_path
    # 初始化 WebDriver,并传入配置
    driver = wiredriver.Chrome(options=chrome_options)
    return driver

# 获取启信宝的地址
def get_qixin_url(url):
    if 'www.sdxyjq.com:8080' in url:
        url = url.replace('www.sdxyjq.com:8080', 'www.sdxyjq.com')

    headers = {
        "User-Agent": "Mozilla/5.0 (Windows NT 10.0; Win64; x64) AppleWebKit/537.36 (KHTML, like Gecko) Chrome/113.0.0.0 Safari/537.36"
    }
    response = requests.get(url, headers=headers)
    html_content = response.text
    soup = BeautifulSoup(html_content, 'html.parser')
    iframe = soup.find('iframe')
    qiXinUrl = ''
    if iframe:
        src = iframe.get('src')
        qiXinUrl = src

    return qiXinUrl

# 格式化请求体
def parse_response_body(response_body_binary):
    try:
        # 检查数据是否以 gzip 开头
        is_gzip = response_body_binary.startswith(b'\\x1f\\x8b')
        if is_gzip:
            with gzip.GzipFile(fileobj=io.BytesIO(response_body_binary), mode='rb') as f:
                return json.loads(f.read().decode('utf-8'))
        else:
            # print('直接解码为 JSON')
            return json.loads(response_body_binary.decode('utf-8'))
    except Exception as e:
        print(f"格式化请求体失败: {e}")
        return None

def extract_response_body(requests, keyword):
    for request in requests:
        if keyword in request.url:
            return request.response.body
    return None

def getQiXinCompInfo(url:str,chromePath:str):
    try:
        # 初始化浏览器
        driver = initialize_driver(chromePath)
        # 访问启信宝的网页
        driver.get(get_qixin_url(url))
        time.sleep(3)
        # 使用 WebDriverWait 等待页面加载完成之后继续操作,等待时间根据网络情况进行调整
        wait = WebDriverWait(driver, 30)# 超时时间30s
        # 等待页面的 document.readyState 变为 "complete"
        wait.until(lambda driver: driver.execute_script("return document.readyState") == "complete")
        # 获取所有拦截的请求
        requests = driver.requests
        # 获取企业的标签信息 getEntLabel
        res_getEntLabel = extract_response_body(requests, 'getEntLabel')
        if res_getEntLabel is not None:
            res_getEntLabel = parse_response_body(res_getEntLabel)
        else:
            res_getEntLabel =''
        # 获取企业地址信息   getGeocode
        res_getGeocode = extract_response_body(requests, 'getGeocode')
        if res_getGeocode is not None:
            res_getGeocode = parse_response_body(res_getGeocode)
        else:
            res_getGeocode = ''
        # 获取企业的工商信息 getEntBasicInfoNew
        res_getEntBasicInfoNew = extract_response_body(requests,'getEntBasicInfoNew')
        if res_getEntBasicInfoNew is not None:
            res_getEntBasicInfoNew = parse_response_body(res_getEntBasicInfoNew)
        else:
            res_getEntBasicInfoNew = ''

        return {
            'baseInfo': res_getEntBasicInfoNew,
            'tagInfo': res_getEntLabel,
            'addressInfo': res_getGeocode,
        }
    finally:
        # 关闭浏览器
        driver.quit()
Flask 是什么?
Flask 是一个用 Python 编写的轻量级 Web 框架 ,它为构建 Web 应用程序和 RESTful API 提供了灵活的基础。Flask 的设计哲学是“简洁和可扩展”,它没有捆绑任何数据库或 ORM(对象关系映射)工具,开发者可以根据需求自由选择技术栈。
Flask 的核心特点
轻量级与灵活性 :
- 没有强制性的数据库或 ORM,开发者可以自由选择技术(如 SQLite、MySQL、MongoDB 等)。
- 不依赖模板引擎,默认提供简单模板,也可以替换为其他引擎(如 Jinja2)。
路由系统 :
- 通过装饰器(Decorator)将 URL 路径映射到 Python 函数
扩展性 :
通过第三方扩展(Extensions)增强功能,例如:
- Flask-SQLAlchemy :数据库操作。
- Flask-RESTful :快速构建 RESTful API。
- Flask-Login :用户认证。
- Flask-JWT :基于 JWT 的身份验证。
开发友好 :
- 内置调试模式(Debug Mode),实时反映代码修改。
- 支持单元测试和集成测试。
社区支持 :
- 拥有活跃的开源社区和丰富的文档,适合快速开发和学习。
Flask 的典型应用场景
小型 Web 应用 :
- 适合快速开发个人博客、仪表盘、内部工具等。
RESTful API 开发 :
- 构建数据接口(如 JSON API),常用于前后端分离项目。
微服务架构 :
- 由于轻量级特性,适合构建独立的微服务模块。
学习 Web 开发 :
- 简单的 API 和路由设计使其成为学习 Web 开发的理想工具。
Flask 与 Django 的对比
| 特性 | FLASK | DJANGO |
|---|---|---|
| 设计理念 | 轻量级、灵活,最小功能集 | 重量级、全功能, batteries-included |
| 默认组件 | 无 ORM、模板引擎(可选) | 内置 ORM(Django ORM)、模板引擎 |
| 学习曲线 | 低(简单直接) | 高(功能丰富但复杂) |
| 适用场景 | 小型项目、API、需要高度控制的场景 | 企业级大型项目、快速全栈开发 |

搜索页面和这个相关的从而定位到引入文件

查找,一眼Base64编码的字体文件,通过这个编码数据解码获得原字体文件
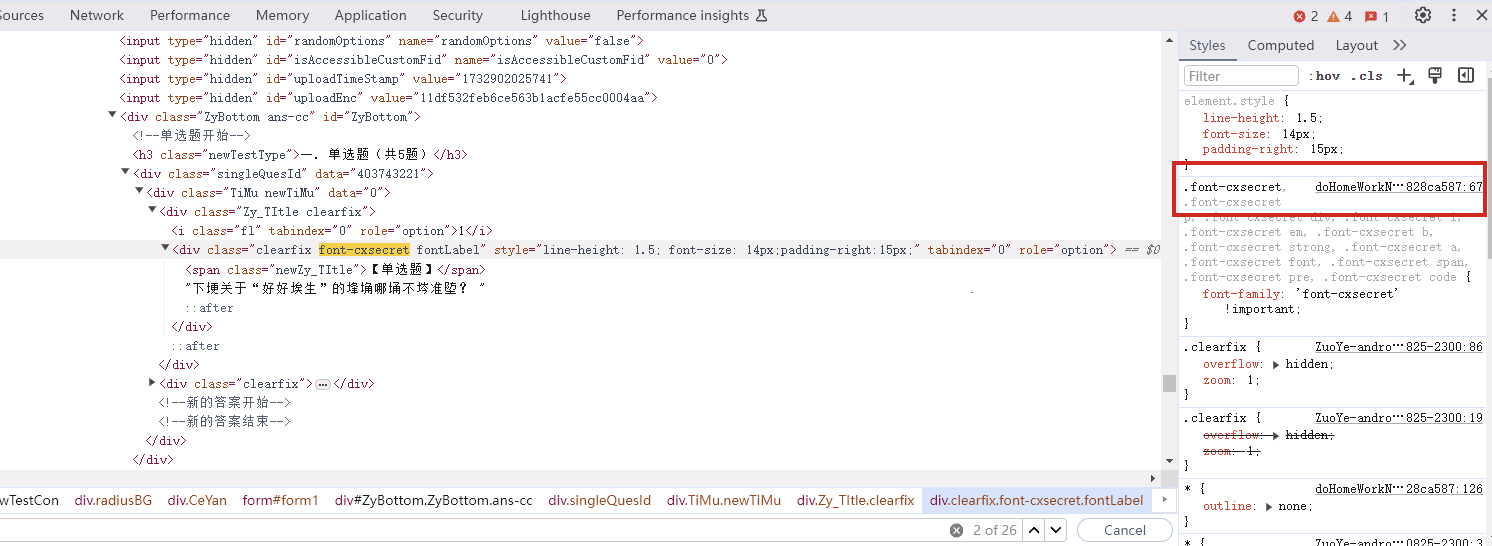
找到之后进去查看
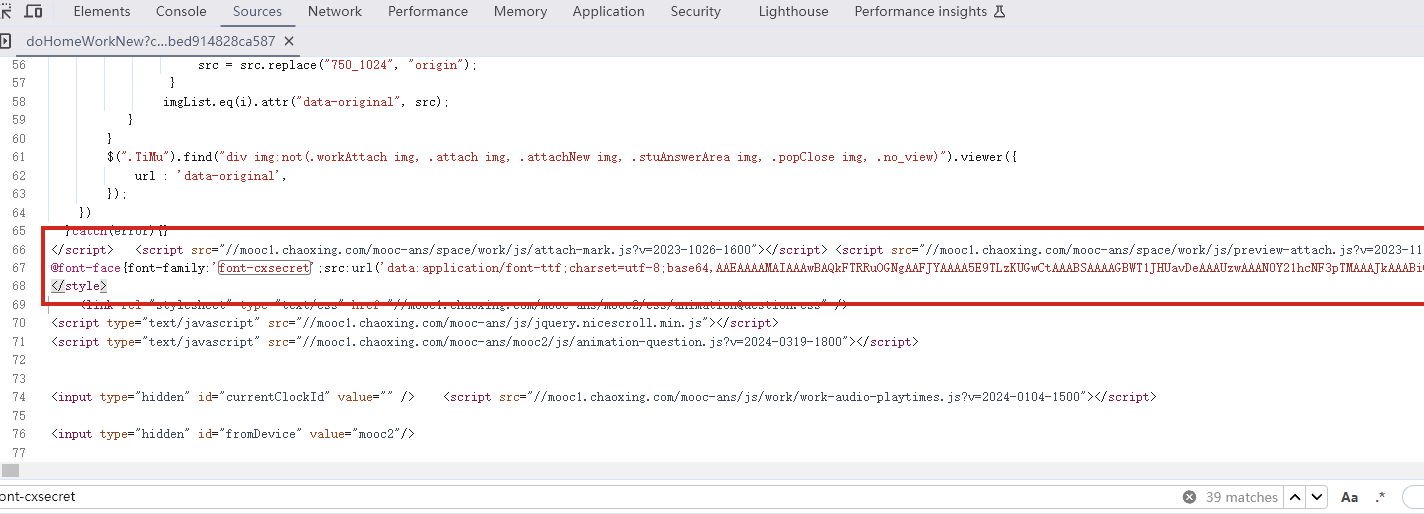
找到了,把里面内容复制下来,掐头去尾,是这样的数据
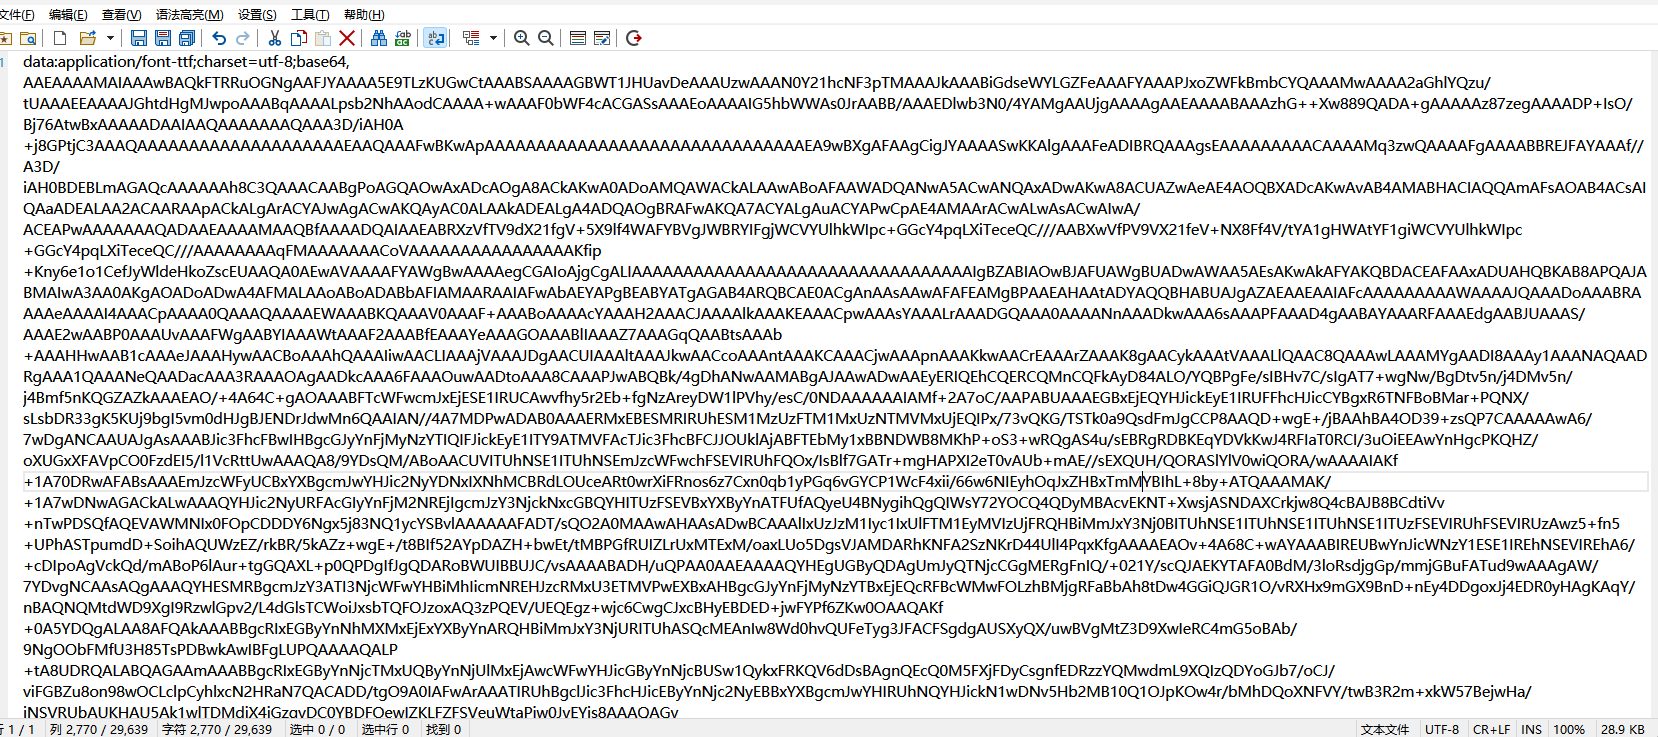
编写脚本进行解码,引号内填写base64编码数据去掉data:application/font-ttf;charset=utf-8;base64,的开头声明"
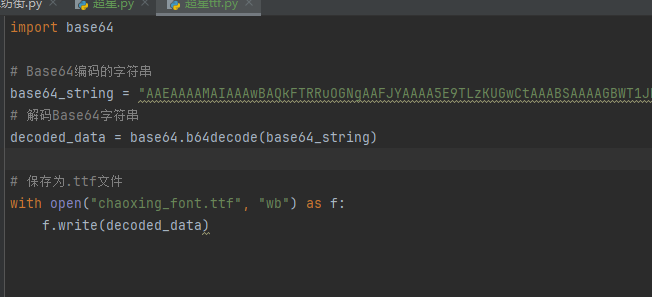
import base64

# Base64编码的字符串
base64_string = "这里填写base64编码数据去掉data:application/font-ttf;charset=utf-8;base64,的开头声明"
# 解码Base64字符串
decoded_data = base64.b64decode(base64_string)

# 保存为.ttf文件
with open("chaoxing_font.ttf", "wb") as f:
    f.write(decoded_data)
获得到base64的ttf文件结果
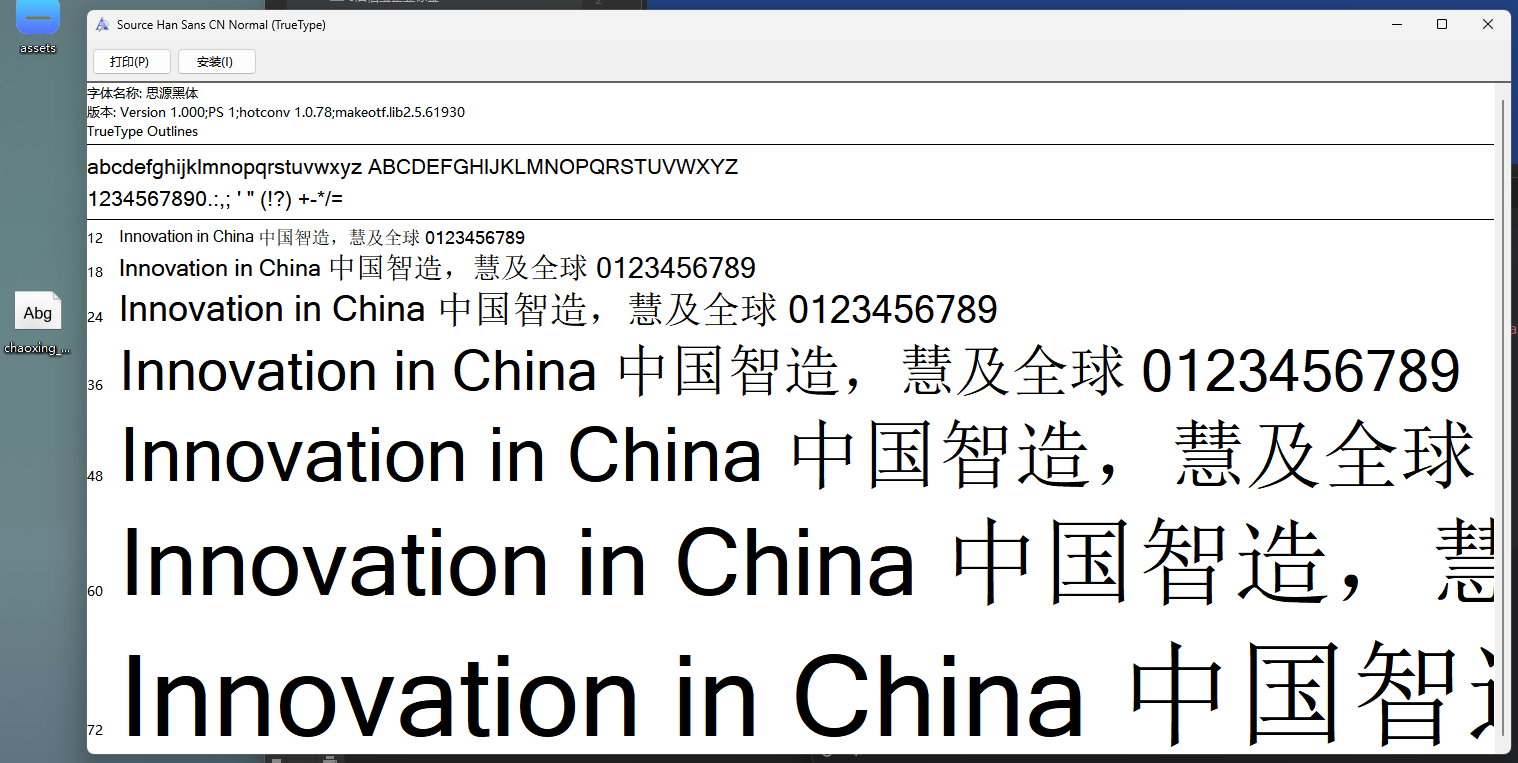
使用字体查看器查看字体 https://www.bejson.com/ui/font/
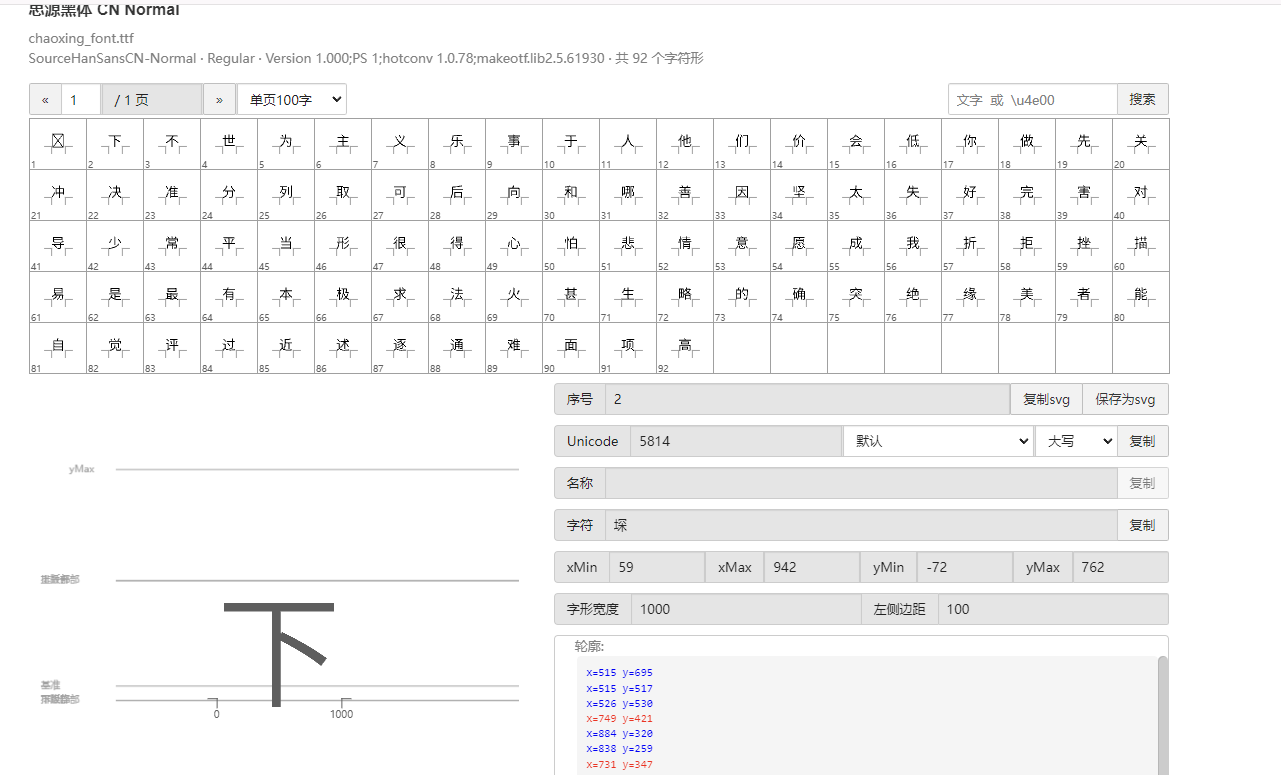
接下来将ttf文件转换成xml文件(python需要安装fontTools)
from fontTools.ttLib import TTFont

# TTF 文件路径
ttf_path = r"D:\UserData\Desktop\chaoxing_font.ttf"
xml_output_path = r"D:\UserData\Desktop\chaoxing_font.xml"
# 加载字体文件
font = TTFont(ttf_path)
# 保存为 XML 文件
font.saveXML(xml_output_path)
print(f"解析完毕")
抽选字体对比一下映射结果对不对(超星的加密是修改了此字体图元数据,显示成未加密的字)
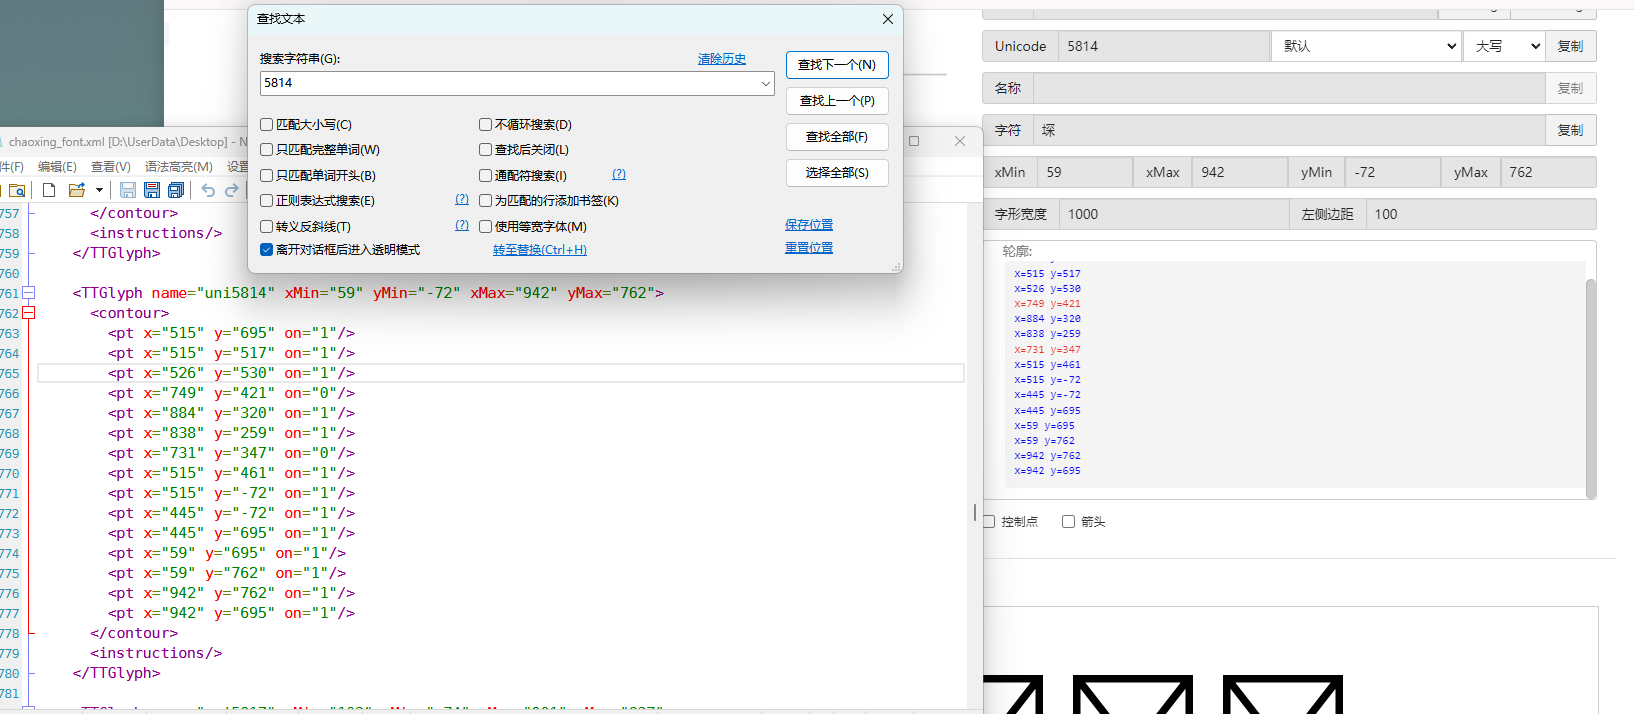
下载原来的字体文件(非超星加密后的文件)
源字体文件对应
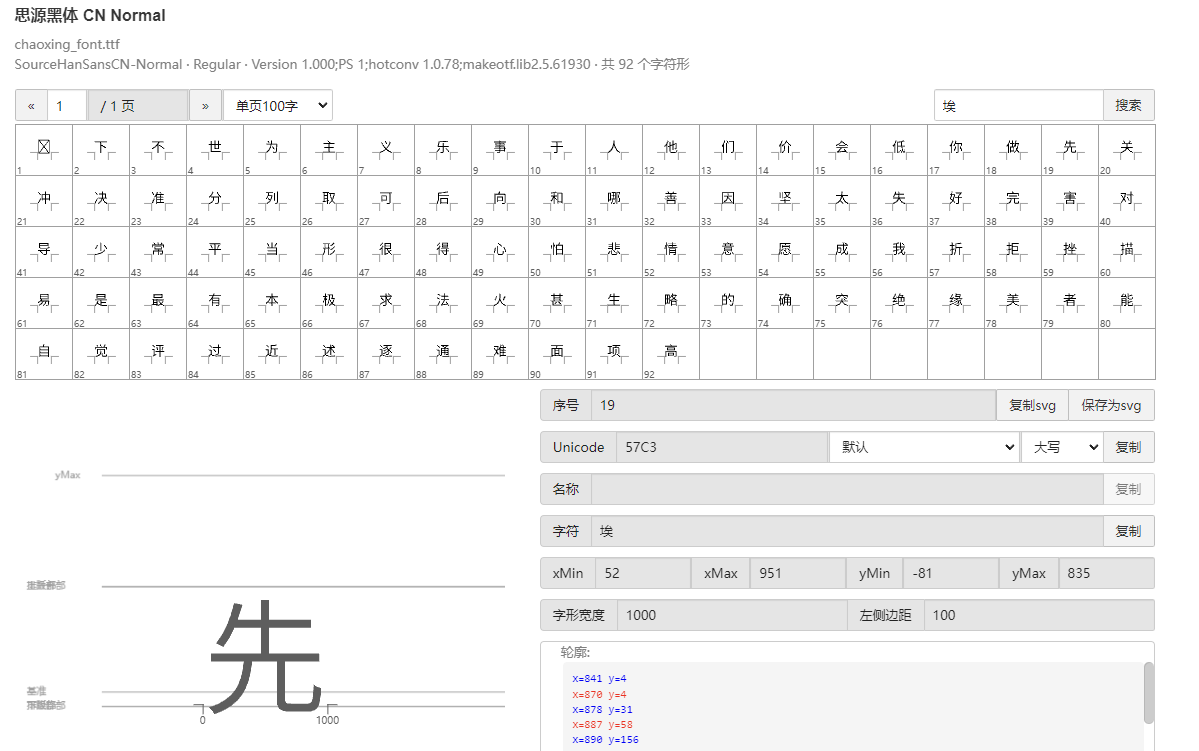
超星加密后字体
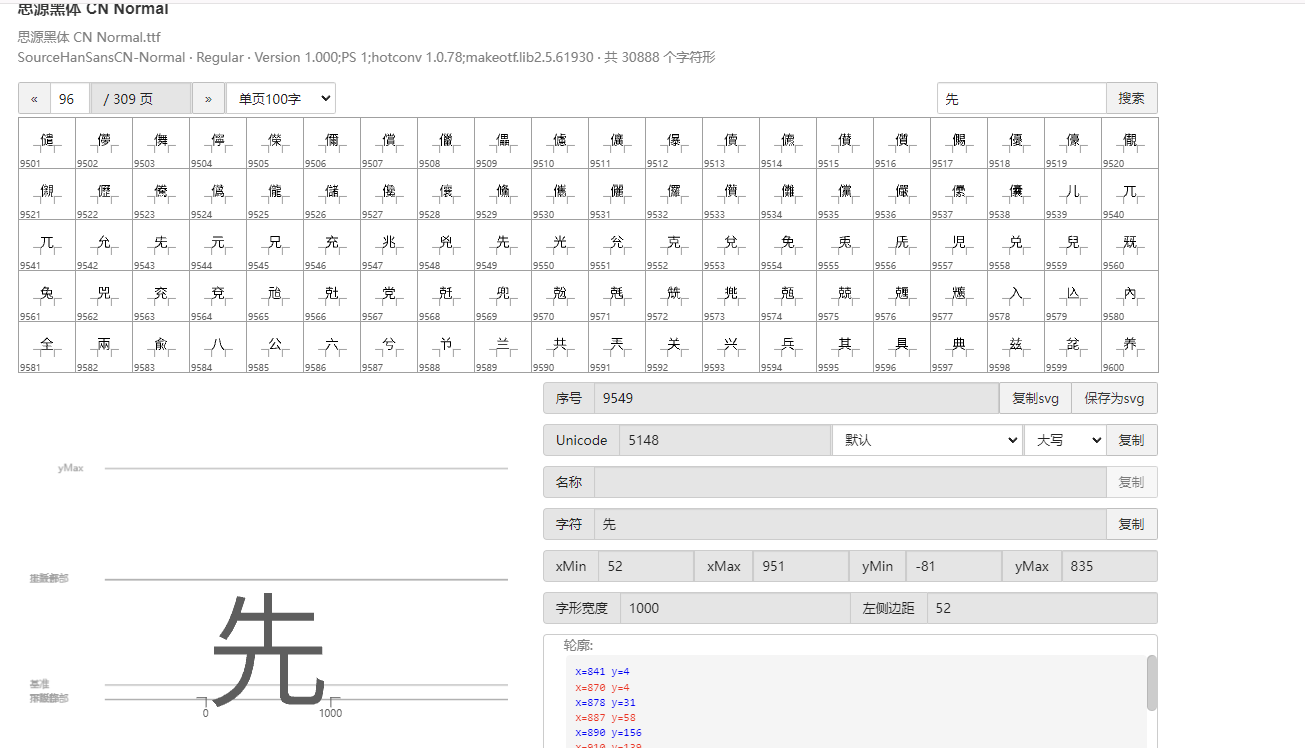
也就是说原来的5148对应着57C3
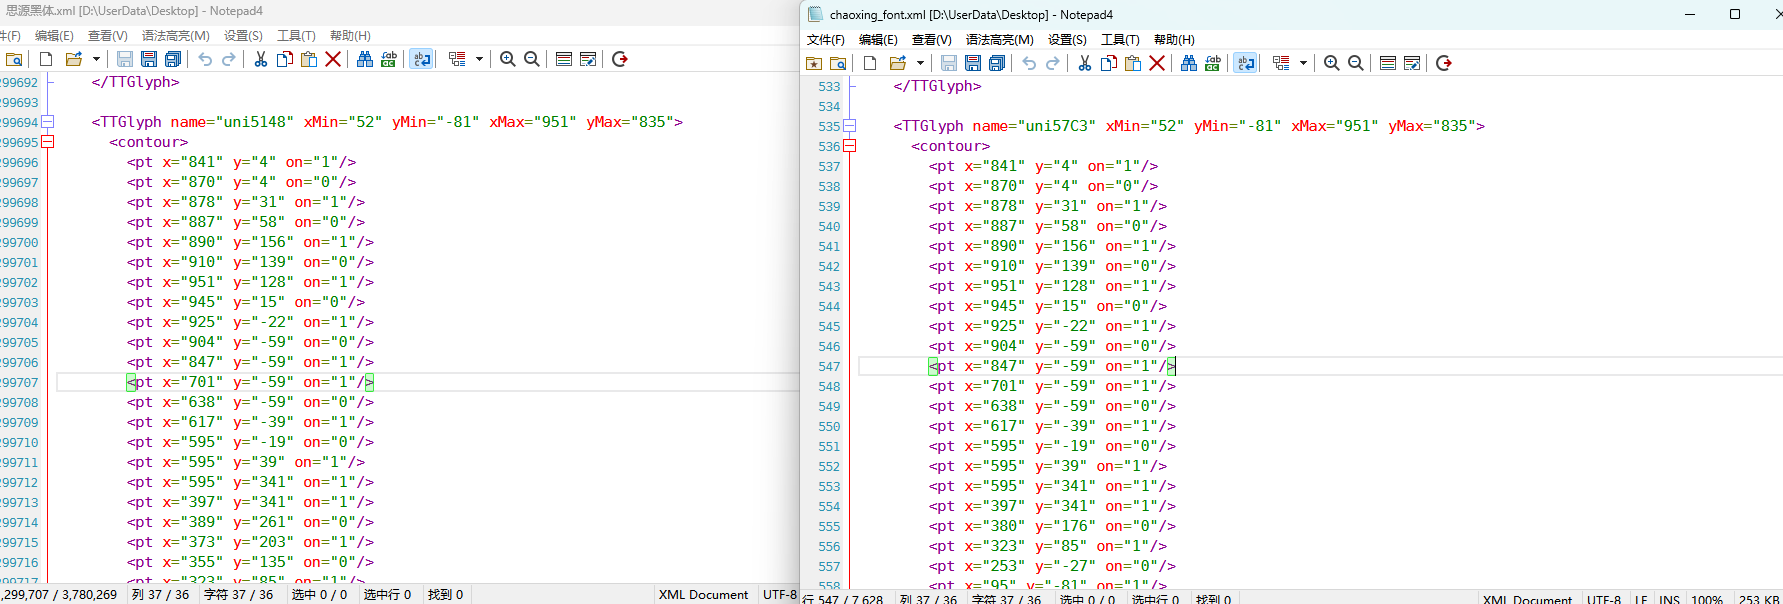
编写对比代码进行测试
import xml.etree.ElementTree as ET
import hashlib
import json


def parse_glyphs(file_path):
    """
    解析字体文件中的 TTGlyph 信息
    """
    tree = ET.parse(file_path)
    root = tree.getroot()

    glyphs = {}

    for glyph in root.findall(".//TTGlyph"):
        name = glyph.get("name")
        points = []
        for pt in glyph.findall(".//pt"):
            x = pt.get("x")
            y = pt.get("y")
            on = pt.get("on")
            points.append(f"{x}{y}{on}")

        # 生成轮廓的唯一哈希值
        hash_value = hashlib.md5("".join(points).encode('utf-8')).hexdigest()

        # 截取哈希值的 25-32 位来作为唯一标识
        truncated_hash = hash_value[24:32]

        glyphs[truncated_hash] = name  # 使用截取后的哈希值作为键

    return glyphs


def get_unicode_character(name):
    """
    根据 glyph 名称(如 uni5148)获取对应汉字
    """
    if name.startswith("uni"):
        try:
            unicode_value = int(name[3:], 16)
            return chr(unicode_value)
        except ValueError:
            return None
    return None


def build_mapping(xml_old_path, xml_cx_path):
    """
    建立思源黑体和超星字体的对照关系
    """
    old_glyphs = parse_glyphs(xml_old_path)
    print(len(old_glyphs))
    cx_glyphs = parse_glyphs(xml_cx_path)
    print(len(cx_glyphs))

    mapping = []

    for cx_hash, cx_name in cx_glyphs.items():
        if cx_hash in old_glyphs:
            old_name = old_glyphs[cx_hash]
            character = get_unicode_character(old_name)
            if character:  # 确保是有效汉字
                mapping.append({
                    "chaoxing": cx_name,
                    "si_yuan": {
                        "siyuan_name": old_name,
                        "siyuan_name_value": character
                    }
                })

    return mapping


if __name__ == "__main__":
    xml_old_path = r"D:\UserData\Desktop\思源黑体.xml"
    xml_cx_path = r"D:\UserData\Desktop\chaoxing_font.xml"

    result = build_mapping(xml_old_path, xml_cx_path)

    # 输出到文件
    with open("glyph_mapping.json", "w", encoding="utf-8") as f:
        json.dump(result, f, ensure_ascii=False, indent=4)

    # 打印部分结果
    # print(json.dumps(result[:5], ensure_ascii=False, indent=4))
生成结果
[
    {
        "chaoxing": "uni57C2",
        "si_yuan": {
            "siyuan_name": "uni2FAF",
            "siyuan_name_value": "⾯"
        }
    },
    {
        "chaoxing": "uni57E0",
        "si_yuan": {
            "siyuan_name": "uni5584",
            "siyuan_name_value": "善"
        }
    },
    {
        "chaoxing": "uni580F",
        "si_yuan": {
            "siyuan_name": "uni4E16",
            "siyuan_name_value": "世"
        }
    },
    {
        "chaoxing": "uni581D",
        "si_yuan": {
            "siyuan_name": "uni5BB3",
            "siyuan_name_value": "害"
        }
    },
    {
        "chaoxing": "uni900B",
        "si_yuan": {
            "siyuan_name": "uni2F83",
            "siyuan_name_value": "⾃"
        }
    }
]
我采用的字符串是
超星:下埂关于“好好埃生”的埄埆哪埇不埁准埅?
思源:下面关于“好好先生”的描述哪项不太准确?
结合对照表显示,发现字体字形数据并对不上,查看字体数据,针对“下“字进行分析,发现两边结果并对不上,结果是超星对于字体字形进行了更改,并不是简单的对比字符哈希值就可以对比出来的了。
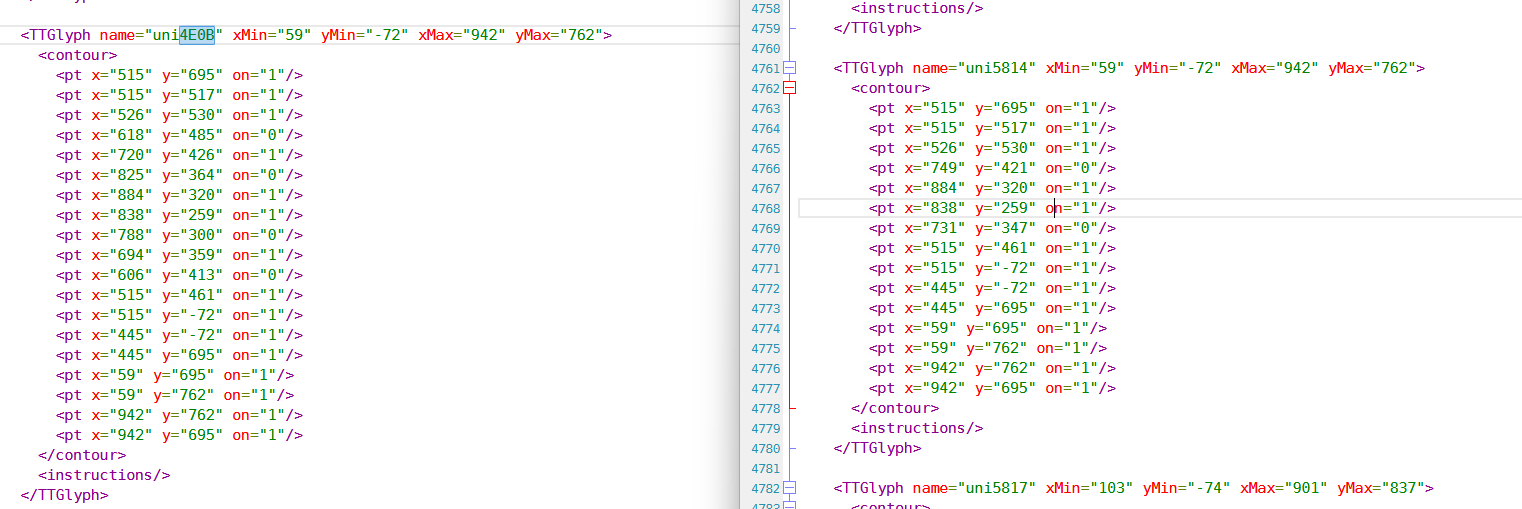
查看对比效果
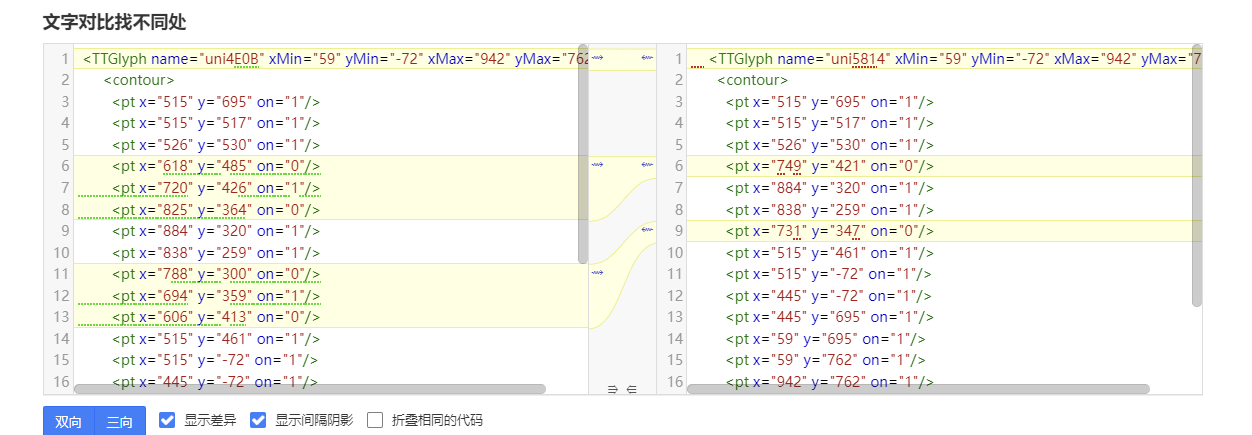
左侧为原版字体,右侧为学习通字体

百度到” I Am I“大佬的文章”从学习通复制文字乱码看前端版权保护“找到一定的思路是假设字符的边距是唯一的,好的,那么我们就拼接边距距离。得出以下代码
import xml.etree.ElementTree as ET
import hashlib
import json


def parse_glyphs(file_path):
    """
    解析字体文件中的 TTGlyph 信息,使用 xMin, yMin, xMax, yMax 作为唯一标识
    """
    tree = ET.parse(file_path)
    root = tree.getroot()

    glyphs = {}

    for glyph in root.findall(".//TTGlyph"):
        name = glyph.get("name")

        # 获取 xMin, yMin, xMax, yMax
        xMin = glyph.get("xMin")
        yMin = glyph.get("yMin")
        xMax = glyph.get("xMax")
        yMax = glyph.get("yMax")

        # 使用这四个值拼接成唯一标识符
        if xMin and yMin and xMax and yMax:
            unique_key = f"{xMin}{yMin}{xMax}{yMax}"
            glyphs[unique_key] = name  # 用四个边界值作为唯一键,值为glyph名称

    return glyphs
# def parse_glyphs(file_path):
#     """
#     解析字体文件中的 TTGlyph 信息
#     """
#     tree = ET.parse(file_path)
#     root = tree.getroot()
#
#     glyphs = {}
#
#     for glyph in root.findall(".//TTGlyph"):
#         name = glyph.get("name")
#         points = []
#         for pt in glyph.findall(".//pt"):
#             x = pt.get("x")
#             y = pt.get("y")
#             on = pt.get("on")
#             points.append(f"{x}{y}{on}")
#
#         # 生成轮廓的唯一哈希值
#         hash_value = hashlib.md5("".join(points).encode('utf-8')).hexdigest()
#         glyphs[hash_value] = name  # 哈希值对应 glyph 名称
#
#     return glyphs


def get_unicode_character(name):
    """
    根据 glyph 名称(如 uni5148)获取对应汉字
    """
    if name.startswith("uni"):
        try:
            unicode_value = int(name[3:], 16)
            return chr(unicode_value)
        except ValueError:
            return None
    return None


def build_mapping(xml_old_path, xml_cx_path):
    """
    建立思源黑体和超星字体的对照关系
    """
    old_glyphs = parse_glyphs(xml_old_path)
    # print(len(old_glyphs))
    cx_glyphs = parse_glyphs(xml_cx_path)
    # print(len(cx_glyphs))
    # print(cx_glyphs)
    mapping = []

    for cx_hash, cx_name in cx_glyphs.items():

        if cx_hash in old_glyphs:
            old_name = old_glyphs[cx_hash]
            character = get_unicode_character(old_name)
            if cx_name == 'uni5814':
                print(cx_hash)
                print(old_name)

            if character:  # 确保是有效汉字
                mapping.append({
                    "chaoxing": cx_name,
                    "si_yuan" : {
                        "siyuan_name": old_name,
                        "siyuan_name_value": character
                    }
                })

    return mapping


if __name__ == "__main__":
    xml_old_path = r"D:\UserData\Desktop\思源黑体.xml"
    xml_cx_path = r"D:\UserData\Desktop\chaoxing_font.xml"

    result = build_mapping(xml_old_path, xml_cx_path)

    # 输出到文件
    with open("glyph_mapping.json", "w", encoding="utf-8") as f:
        json.dump(result, f, ensure_ascii=False, indent=4)

    # 打印部分结果
    # print(json.dumps(result[:5], ensure_ascii=False, indent=4))
再通过匹配结果进行查看数据
import json

# 读取json
def load_mapping(file_path):
    with open(file_path, "r", encoding="utf-8") as f:
        return json.load(f)

# 获取字符对应的 uni 名称
def get_uni_name(character, mapping):
    unicode_name = f"uni{ord(character):X}"
    # print(unicode_name)
    for entry in mapping:
        if entry["chaoxing"] == unicode_name:
            return entry
    return None

# 解析字符串
def parse_code(code, mapping):
    result = []
    for char in code:
        mapping_entry = get_uni_name(char, mapping)
        if mapping_entry:
            result.append({
                "char": char,
                "message": mapping_entry["si_yuan"]['siyuan_name_value']
            })
        else:
            result.append({
                "char": char,
                "message": char
            })
    return result

# 测试代码
if __name__ == "__main__":
    # 读取字形映射
    glyph_mapping_file = "glyph_mapping.json"
    mapping = load_mapping(glyph_mapping_file)
    # 示例字符串
    code = '下埂关于“好好埃生”的埄埆哪埇不埁准埅?'
    # 解析字符串
    parsed_result = parse_code(code, mapping)
    # 输出解析结果
    # for item in parsed_result:
    #     print(item)
    print(f'超星字体:{code}')
    siyuan_font = ''.join([item['message'] for item in parsed_result])
    print(f'思源字体:{siyuan_font}')
得出结果
超星字体:下埂关于“好好埃生”的埄埆哪埇不埁准埅?
思源字体:下⾯关于“好好先生”的描述哪项不太准确?
在大佬的测试中,是可以确定90%左右的字符数据的。如果您不想看了,到这里就可以了,基本满足所有的效果了。
然后由于最近领导给我一些任务就是比较两个字符串的相似度,通过这个启发就想通过xy向量计算字符字形的相似度。得出以下代码,首先针对”下”字进行数据测试
归一化:将所有点归一化到相同的尺度。(如果不归一,DTW有要求长度一样,会报错)
归一化点集(Normalization of points)是指将原始点集中的每个点的坐标变换到一个特定的标准范围,以消除由于坐标范围不同而引起的差异,从而使得数据的比较更加公正和一致。具体而言,在这段代码中,归一化的目标是将每个点的坐标缩放到
[0, 1]的范围内。为什么要进行归一化?
在计算点集之间的相似度时(如使用动态时间规整 DTW),不同的点集可能有不同的坐标范围或单位。如果不进行归一化,可能会因为坐标差异较大,导致计算出的相似度偏差较大。归一化的过程能够消除这种影响,让两个点集具有相同的尺度,从而公平地比较它们之间的相似性。
举个例子:
假设有一个点集:
points = [(10, 20), (30, 40), (50, 60), (70, 80)]经过归一化处理后:
- 最小值:
min_x = 10,min_y = 20 - 最大值:
max_x = 70,max_y = 80
每个点将会变成:
(10, 20)变成(0, 0)(30, 40)变成(0.333, 0.333)(50, 60)变成(0.666, 0.666)(70, 80)变成(1, 1)
最终,这些点就会被归一化到
[0, 1]的范围内,这样它们的尺度是一致的,适合用于后续的相似度计算。归一化的目的是消除不同点集之间的坐标尺度差异,使得不同的点集可以在相同的尺度下进行比较。通过这种方式,我们可以更加公平地计算它们之间的相似度,而不会因为坐标的差异导致错误的比较结果。- 最小值:
使用DTW进行点对齐:保持原有的DTW对齐方法。
这里计算两个点集的相似度分数,通过DTW距离计算得出一个0~1的相似度分数。1完全相似,0完全不一样。
函数使用
fastdtw函数计算归一化后的两个点集之间的 DTW 距离。DTW 是一种衡量两组时间序列相似度的算法,常用于处理不等长、速度不同的序列数据。在这里,它也可以用于比较两个二维点集的相似度。- 计算相似度:基于对齐后的点集计算相似度。
import numpy as np
from fastdtw import fastdtw
from scipy.spatial.distance import euclidean

# 假设我们已经有了两个字形的数据
ttglyph_superstar = [
    (515, 695), (515, 517), (526, 530), (749, 421), (884, 320),
    (838, 259), (731, 347), (515, 461), (515, -72), (445, -72),
    (445, 695), (59, 695), (59, 762), (942, 762), (942, 695)
]

ttglyph_sourcehan = [
    (515, 695), (515, 517), (526, 530), (618, 485), (720, 426),
    (825, 364), (884, 320), (838, 259), (788, 300), (694, 359),
    (606, 413), (515, 461), (515, -72), (445, -72), (445, 695),
    (59, 695), (59, 762), (942, 762), (942, 695)
]

# 转换为numpy数组
points1 = np.array(ttglyph_superstar)
points2 = np.array(ttglyph_sourcehan)

def normalize_points(points):
    """
    归一化点集
    """
    if len(points) == 0:  # 检查点集是否为空
        return []

    points = np.array(points)  # 将点集转换为NumPy数组
    min_x, min_y = np.min(points, axis=0)
    max_x, max_y = np.max(points, axis=0)

    # 防止除以零
    if max_x == min_x:
        max_x = min_x + 1
    if max_y == min_y:
        max_y = min_y + 1

    normalized_points = (points - [min_x, min_y]) / [max_x - min_x, max_y - min_y]
    return normalized_points

def calculate_similarity(points1, points2):
    """
    使用DTW计算两个点集之间的相似度
    """
    points1_normalized = normalize_points(points1)
    points2_normalized = normalize_points(points2)

    if len(points1_normalized) == 0 or len(points2_normalized) == 0:
        return 0.0  # 如果任一点集为空,相似度为0
    #distance 是 DTW 算法计算出来的总距离,表示两个点集的整体差异。
    #path 是 DTW 算法找到的最佳对齐路径,指示了如何从 points1 映射到 points2。
    distance, path = fastdtw(points1_normalized, points2_normalized, dist=euclidean)
    # DTW 算法会计算出一组“对齐”路径,通过这个路径可以重新排列两个点集,使它们更好地对齐。根据 path 的内容,分别从 points1_normalized 和 points2_normalized 中提取对齐后的点集。
    aligned_points1 = [points1_normalized[i] for i, _ in path]
    aligned_points2 = [points2_normalized[j] for _, j in path]
    # 计算对齐点之间的欧几里得距离,在最佳对齐下,每对点之间的差异。np.linalg.norm 计算的是两点之间的欧几里得距离
    distances = [np.linalg.norm(np.array(p1) - np.array(p2)) for p1, p2 in zip(aligned_points1, aligned_points2)]
    # 算出所有欧氏距离去平局书,得出平均欧氏距距离
    average_distance = np.mean(distances)

    similarity_score = 1 / (1 + average_distance)
    return similarity_score


print(f"Similarity score: {calculate_similarity(points2,points1)}")
得出结果
Similarity score: 0.975700703557036发现相似度还是很高的,这里是需要忽略字体的风格的,和笔画的这些。
好的,可以通过这种相似度算法去核对超星字体对应的元数据了。
import xml.etree.ElementTree as ET
import json
import numpy as np
from fastdtw import fastdtw
from scipy.spatial.distance import euclidean
from tqdm import tqdm

def parse_glyphs(file_path):
    """
    解析字体文件中的 TTGlyph 信息
    """
    tree = ET.parse(file_path)
    root = tree.getroot()

    glyphs = {}

    for glyph in root.findall(".//TTGlyph"):
        name = glyph.get("name")
        points = []
        for pt in glyph.findall(".//pt"):
            x = int(pt.get("x"))
            y = int(pt.get("y"))
            on = int(pt.get("on", 0))  # 默认值为0,如果不存在则设为0
            points.append((x, y))

        # 将点集转换为字符串,作为字典的键
        key = str(points)
        glyphs[key] = name

    return glyphs

def get_unicode_character(name):
    """
    根据 glyph 名称(如 uni5148)获取对应汉字
    """
    if name.startswith("uni"):
        try:
            unicode_value = int(name[3:], 16)
            return chr(unicode_value)
        except ValueError:
            return None
    return None

def normalize_points(points):
    """
    归一化点集
    """
    if not points:  # 检查点集是否为空
        return []

    points = np.array(points)  # 将点集转换为NumPy数组
    min_x, min_y = np.min(points, axis=0)
    max_x, max_y = np.max(points, axis=0)

    # 防止除以零
    if max_x == min_x:
        max_x = min_x + 1
    if max_y == min_y:
        max_y = min_y + 1

    normalized_points = (points - [min_x, min_y]) / [max_x - min_x, max_y - min_y]
    return normalized_points

def calculate_similarity(points1, points2):
    """
    使用DTW计算两个点集之间的相似度
    """
    points1_normalized = normalize_points(points1)
    points2_normalized = normalize_points(points2)

    if len(points1_normalized) == 0 or len(points2_normalized) == 0:
        return 0.0  # 如果任一点集为空,相似度为0

    distance, path = fastdtw(points1_normalized, points2_normalized, dist=euclidean)

    aligned_points1 = [points1_normalized[i] for i, _ in path]
    aligned_points2 = [points2_normalized[j] for _, j in path]

    distances = [np.linalg.norm(np.array(p1) - np.array(p2)) for p1, p2 in zip(aligned_points1, aligned_points2)]
    average_distance = np.mean(distances)

    similarity_score = 1 / (1 + average_distance)
    return similarity_score

def build_mapping(xml_old_path, xml_cx_path):
    """
    建立思源黑体和超星字体的对照关系
    """
    old_glyphs = parse_glyphs(xml_old_path)
    print(f'思源字体:{len(old_glyphs)}')
    cx_glyphs = parse_glyphs(xml_cx_path)
    print(f'超星字体:{len(cx_glyphs)}')

    mapping = []

    total_combinations = len(old_glyphs) * len(cx_glyphs)
    with tqdm(total=total_combinations, desc="Processing") as pbar:
        for old_key, old_name in old_glyphs.items():
            for cx_key, cx_name in cx_glyphs.items():
                similarity = calculate_similarity(eval(old_key), eval(cx_key))
                if similarity >= 0.9:
                    mapping.append({
                        "chaoxing": {
                            "cx_name": cx_name,
                            "cx_character": get_unicode_character(cx_name)
                        },
                        "si_yuan": {
                            "sy_name": old_name,
                            "sy_character": get_unicode_character(old_name)
                        },
                        "similarity": similarity
                    })
                pbar.update(1)

    return mapping

if __name__ == "__main__":
    xml_old_path = r"D:\UserData\Desktop\思源黑体.xml"
    xml_cx_path = r"D:\UserData\Desktop\chaoxing_font.xml"

    result = build_mapping(xml_old_path, xml_cx_path)

    # 输出到文件
    with open("glyph_mapping2.json", "w", encoding="utf-8") as f:
        json.dump(result, f, ensure_ascii=False, indent=4)

    # print(json.dumps(result[:5], ensure_ascii=False, indent=4))
但是运行效果不如人意

这么长的时间肯定是不能忍的,所有采用多线程的处理方式,cpu就应该忙起来了。
from concurrent.futures import ProcessPoolExecutor, as_completed
import json
import numpy as np
from fastdtw import fastdtw
from scipy.spatial.distance import euclidean
from tqdm import tqdm
import xml.etree.ElementTree as ET

# 其他函数不变,保持之前的代码
def calculate_similarity(points1, points2):
    """
    使用DTW计算两个点集之间的相似度
    """
    points1_normalized = normalize_points(points1)
    points2_normalized = normalize_points(points2)

    if len(points1_normalized) == 0 or len(points2_normalized) == 0:
        return 0.0  # 如果任一点集为空,相似度为0

    distance, path = fastdtw(points1_normalized, points2_normalized, dist=euclidean)

    aligned_points1 = [points1_normalized[i] for i, _ in path]
    aligned_points2 = [points2_normalized[j] for _, j in path]

    distances = [np.linalg.norm(np.array(p1) - np.array(p2)) for p1, p2 in zip(aligned_points1, aligned_points2)]
    average_distance = np.mean(distances)

    similarity_score = 1 / (1 + average_distance)
    return similarity_score

def normalize_points(points):
    """
    归一化点集
    """
    if not points:  # 检查点集是否为空
        return []

    points = np.array(points)  # 将点集转换为NumPy数组
    min_x, min_y = np.min(points, axis=0)
    max_x, max_y = np.max(points, axis=0)

    # 防止除以零
    if max_x == min_x:
        max_x = min_x + 1
    if max_y == min_y:
        max_y = min_y + 1

    normalized_points = (points - [min_x, min_y]) / [max_x - min_x, max_y - min_y]
    return normalized_points

def parallel_calculate_similarity(old_key, old_name, cx_glyphs):
    """
    并行计算相似度
    """
    results = []
    for cx_key, cx_name in cx_glyphs.items():
        similarity = calculate_similarity(eval(old_key), eval(cx_key))
        if similarity >= 0.9:
            results.append({
                "chaoxing": {
                    "cx_name": cx_name,
                    "cx_character": get_unicode_character(cx_name)
                },
                "si_yuan": {
                    "sy_name": old_name,
                    "sy_character": get_unicode_character(old_name)
                },
                "similarity": similarity
            })
    return results

def get_unicode_character(name):
    """
    根据 glyph 名称(如 uni5148)获取对应汉字
    """
    if name.startswith("uni"):
        try:
            unicode_value = int(name[3:], 16)
            return chr(unicode_value)
        except ValueError:
            return None
    return None

def parse_glyphs(file_path):
    """
    解析字体文件中的 TTGlyph 信息
    """
    tree = ET.parse(file_path)
    root = tree.getroot()

    glyphs = {}

    for glyph in root.findall(".//TTGlyph"):
        name = glyph.get("name")
        points = []
        for pt in glyph.findall(".//pt"):
            x = int(pt.get("x"))
            y = int(pt.get("y"))
            on = int(pt.get("on", 0))  # 默认值为0,如果不存在则设为0
            points.append((x, y))

        # 将点集转换为字符串,作为字典的键
        key = str(points)
        glyphs[key] = name

    return glyphs


def build_mapping_parallel(xml_old_path, xml_cx_path):
    """
    并行建立思源黑体和超星字体的对照关系
    """
    old_glyphs = parse_glyphs(xml_old_path)
    print(f'思源字体:{len(old_glyphs)}')
    cx_glyphs = parse_glyphs(xml_cx_path)
    print(f'超星字体:{len(cx_glyphs)}')

    mapping = []

    # 使用进程池进行并行处理
    with ProcessPoolExecutor() as executor:
        futures = []
        # 为每个思源字体字形提交任务
        for old_key, old_name in old_glyphs.items():
            futures.append(executor.submit(parallel_calculate_similarity, old_key, old_name, cx_glyphs))

        # 通过 as_completed 获取计算结果
        for future in tqdm(as_completed(futures), total=len(futures), desc="Processing"):
            mapping.extend(future.result())

    return mapping

if __name__ == "__main__":
    xml_old_path = r"D:\UserData\Desktop\思源黑体.xml"
    xml_cx_path = r"D:\UserData\Desktop\chaoxing_font.xml"

    result = build_mapping_parallel(xml_old_path, xml_cx_path)

    # 输出到文件
    with open("glyph_mapping_parallel.json", "w", encoding="utf-8") as f:
        json.dump(result, f, ensure_ascii=False, indent=4)

    # 打印部分结果
    print(json.dumps(result[:5], ensure_ascii=False, indent=4))
这样处理时间来到了半小时(不过cpu要满了),因为我要求把大于0.9的数据全弄出来了,所以会有很多重复的字形数据。这里还需要取出相似度最高的那一个字形数据。
import json

# 读取保存的结果文件并生成包含所有相似度最高数据的 high.json 文件
def find_most_similar_for_all(result_file="glyph_mapping_parallel.json", output_file="high.json"):
    # 读取 JSON 数据
    with open(result_file, "r", encoding="utf-8") as f:
        data = json.load(f)

    # 用于存储每个 chaoxing 对应的最相似的 si_yuan 对照项
    highest_similarity_entries = {}

    # 遍历所有条目,找出每个 chaoxing 字符对应的最相似的 si_yuan 对照项
    for entry in data:
        cx_name = entry["chaoxing"]["cx_name"]
        similarity = entry["similarity"]

        # 如果该 cx_name 没有出现过,或者当前相似度更高,更新最相似的条目
        if cx_name not in highest_similarity_entries or similarity > highest_similarity_entries[cx_name]["similarity"]:
            highest_similarity_entries[cx_name] = entry


    # print(len(highest_similarity_entries))
    # 将结果保存到 high.json 文件
    with open(output_file, "w", encoding="utf-8") as f:
        json.dump(list(highest_similarity_entries.values()), f, ensure_ascii=False, indent=4)

    print(f"已将结果保存到 {output_file}")

# 调用函数,生成 high.json 文件
find_most_similar_for_all()
至此,我们以及彻底完成了映射表的制作。然后拿数据跑一下进行测试
import json


# 读取 high.json 文件并加载数据
def load_high_json(file_path="high.json"):
    with open(file_path, "r", encoding="utf-8") as f:
        return json.load(f)


# 根据 high.json 匹配字符串中的每个字符,返回结果字符串
def match_string_with_high_json(code, high_json_data):
    result = []

    for char in code:
        # 遍历 high.json 中的所有项,查找匹配的 cx_character
        matched = False
        for entry in high_json_data:
            if entry["chaoxing"]["cx_character"] == char:
                # 根据需要将匹配的结果拼接成字符串
                result.append(entry["si_yuan"]["sy_character"])  # 使用 si_yuan 对应的字符
                matched = True
                break

        if not matched:
            # 如果没有找到匹配的项,保留原字符
            result.append(char)

    # 将匹配结果列表合并成一个字符串
    return ''.join(result)


# 示例字符串
code = '下埂关于“好好埃生”的埄埆哪埇不埁准埅?'

# 加载 high.json 数据
high_json_data = load_high_json()

# 匹配字符串
result_string = match_string_with_high_json(code, high_json_data)
print(f'超星字体:{code}')
print(f'思源字体:{result_string}')
得出结果
超星字体:下埂关于“好好埃生”的埄埆哪埇不埁准埅?
思源字体:下⾯关于“好好先生”的描述哪项不太准确?
好的,已经可以了,这里关于超星字体的时候,有个疑问就是为什么每个页面加载页面的字体,不能拿到全部的,我这个不知道咋弄,很困扰我,希望有大佬可以帮忙解释一下。
至此,文章彻底结束。
参考文章:
关于超星学习通网页版字体加密分析 :https://www.52pojie.cn/thread-1631357-4-1.html
从学习通复制文字乱码看前端版权保护:https://5ime.cn/xxt_font.html
]]>import os
import re
# 常见图片格式
IMAGE_PATTERN = re.compile(r'!\[.*?\]\((.*?\.(?:png|jpe?g|gif|bmp|svg))\)', re.IGNORECASE)
# 路径
base_path = r"D:\oneDrive\Note\blog\source"
def find_md_with_images(base_path):
md_files_with_images = []
for root, _, files in os.walk(base_path):
for file in files:
if file.endswith('.md'):
file_path = os.path.join(root, file)
# 检查文件内容是否包含图片
with open(file_path, 'r', encoding='utf-8') as f:
content = f.read()
if IMAGE_PATTERN.search(content):
md_files_with_images.append(file_path)
return md_files_with_images
# 查找并打印结果
if __name__ == "__main__":
result = find_md_with_images(base_path)
if result:
print(f"包含图片的Markdown文件({len(result)}个):")
for md_file in result:
print(md_file)
else:
print("未找到包含图片的Markdown文件。")DAIL-SQL这个开源模型调试的。研究生说他已经完成了项目的搭建和gpt模型的调试。接下来要改成百度千帆的模型,却遇到了难题。其实很简单,根据项目的框架走就可以了。正常部署环境过后(再次会遇到依赖安装不上,版本不匹配等诸多问题,按照报错排错修改即可)。根据readme生成数据模型之后。接下来就该调试ask_llm.py这一步开始了正式的模型修改了。
首先更改一下init方式
# 初始化百度千帆的api
    init_qianfan(args.QIANFAN_ACCESS_KEY, args.QIANFAN_SECRET_KEY, args.model)
然后查看到init方法是自己写的chatgpt的接口解析,我们就需要模仿人家的写法写一个百度千帆的,根据ERNIE_Speed_128K接口模型进行调试更改
https://cloud.baidu.com/doc/WENXINWORKSHOP/s/6ltgkzya5
之后得出了如下的脚本qianfan.py
import json.decoder

import qianfan
import os
from utils.enums import LLM
import time


def init_qianfan(QIANFAN_ACCESS_KEY, QIANFAN_SECRET_KEY,model):
    os.environ["QIANFAN_ACCESS_KEY"] = QIANFAN_ACCESS_KEY
    os.environ["QIANFAN_SECRET_KEY"] = QIANFAN_SECRET_KEY

# def init_qianfan(QIANFAN_ACCESS_KEY, QIANFAN_SECRET_KEY, model):
#     qianfan.AccessKey(QIANFAN_ACCESS_KEY)
#     qianfan.SecretKey(QIANFAN_SECRET_KEY)
    # os.environ["QIANFAN_ACCESS_KEY"] = QIANFAN_ACCESS_KEY
    # os.environ["QIANFAN_SECRET_KEY"] = QIANFAN_SECRET_KEY


# 处理单轮对话的completion任务
def ask_completion(model, batch, temperature):
    completion = qianfan.Completion()
    response = completion.do(
        model=model,
        prompt=batch,  # 这是当前问题
        temperature=temperature,
        max_output_tokens=200,  # 最大输出token数量,根据需要调整
        top_p=1,
        frequency_penalty=0,
        presence_penalty=0,
        stop=[";"]
    )
    # 提取response中的结果部分
    response_clean = [response["result"]]
    return dict(
        response=response_clean,
        prompt_tokens=response["usage"]["prompt_tokens"],
        completion_tokens=response["usage"]["completion_tokens"],
        total_tokens=response["usage"]["total_tokens"]
    )


# 处理多轮对话的任务
def ask_chat(model, messages: list, temperature, n):
    chat_completion = qianfan.ChatCompletion()
    response = chat_completion.do(
        model=model,
        messages=messages,  # messages 是带有历史对话的消息列表
        temperature=temperature,
        max_output_tokens=200  # 最大输出token数量,根据需要调整
    )
    # 提取返回的消息内容
    response_clean = [response["result"]]
    if n == 1:
        response_clean = response_clean[0]
    return dict(
        response=response_clean,
        prompt_tokens=response["usage"]["prompt_tokens"],
        completion_tokens=response["usage"]["completion_tokens"],
        total_tokens=response["usage"]["total_tokens"]
    )


# 调用对话请i去函数,p判断ask_completion/ask_chat
def ask_llm(model: str, batch: list, temperature: float, n: int):
    n_repeat = 0
    while True:
        try:
            if model in LLM.TASK_COMPLETIONS:  # completion任务
                assert n == 1
                response = ask_completion(model, batch, temperature)
            elif model in LLM.TASK_CHAT:  # chat任务
                assert len(batch) == 1, "batch must be 1 in this mode"
                messages = [{"role": "user", "content": batch[0]}]
                response = ask_chat(model, messages, temperature, n)
                response['response'] = [response['response']]
            break
        except json.decoder.JSONDecodeError:
            n_repeat += 1
            print(f"Repeat for the {n_repeat} times for JSONDecodeError", end="\n")
            time.sleep(1)
            continue
        except Exception as e:
            n_repeat += 1
            print(f"Repeat for the {n_repeat} times for exception: {e}", end="\n")
            time.sleep(1)
            continue

    return response
接下来你如果运行会发现在ask_llm的时候异常会报错,这是因为异常不匹配,我没有细察qianfan的异常有那些,就直接抛出Exception
 try:
                res = ask_llm(args.model, batch, args.temperature, args.n)
            except Exception as e:
                print(f"The {i}-th question has too much tokens! Return \"SELECT\" instead")
                # res = ""
                res = {"response": [""], "total_tokens": 0}
因为二者模型不一样,还需要对结果集进行数据的搜集更改,我这里没做处理,其实只需要一个简单的正则表达式就可以,在如下更改就可以了。
                for sqls, db_id in zip(res["response"], cur_db_ids):
                    processed_sqls = []
                    for sql in sqls:
                        sql = " ".join(sql.replace("\n", " ").split())
                        sql = process_duplication(sql)
                        if sql.startswith("SELECT"):
                            pass
                        elif sql.startswith(" "):
                            sql = "SELECT" + sql
                        else:
                            sql = "SELECT " + sql
                        processed_sqls.append(sql)
由于我没做更改,只得在后续生成的文件中进行数据提取,采用如下方法
def extract_sql(content):
    # 匹配```sql开头 ```结尾
    pattern = r'```sql(.*?)```'
    sql_blocks = re.findall(pattern, content, re.DOTALL)
    sql_statements = []

    for sql in sql_blocks:
        cleaned_sql = " ".join(sql.split())
        sql_statements.append(cleaned_sql)

    return sql_statements
同时还需要再enmus脚本中添加对应的模型来识别
class LLM:
    # openai LLMs
    TEXT_DAVINCI_003 = "text-davinci-003"
    CODE_DAVINCI_002 = "code-davinci-002"
    GPT_35_TURBO = "gpt-3.5-turbo"
    GPT_35_TURBO_0613 = "gpt-3.5-turbo-0613"
    GPT_35_TURBO_16K = "gpt-3.5-turbo-16k"
    GPT_35_TURBO_0301 = "gpt-3.5-turbo-0301"
    GPT_4 = "gpt-4"
    ERNIE_Speed_128K = 'ERNIE-Speed-128K'

    # LLMs that use openai completion api
    TASK_COMPLETIONS = [
        TEXT_DAVINCI_003,
        CODE_DAVINCI_002
    ]

    # LLMs that use openai chat api
    TASK_CHAT = [
        GPT_35_TURBO,
        GPT_35_TURBO_0613,
        GPT_35_TURBO_16K,
        GPT_35_TURBO_0301,
        GPT_4,
        ERNIE_Speed_128K
    ]
脚本ask_llm输入的命令行修改为类似如下的方式
    parser = argparse.ArgumentParser()
    parser.add_argument("--question", type=str)
    parser.add_argument("--QIANFAN_ACCESS_KEY", type=str)
    parser.add_argument("--QIANFAN_SECRET_KEY", type=str)
    # parser.add_argument("--openai_api_key", type=str)
    # parser.add_argument("--openai_group_id", type=str, default="org-ktBefi7n9aK7sZjwc2R9G1Wo")
    parser.add_argument("--model", type=str, choices=[LLM.TEXT_DAVINCI_003,
                                                      LLM.GPT_35_TURBO,
                                                      LLM.GPT_35_TURBO_0613,
                                                      # LLM.TONG_YI_QIAN_WEN,
                                                      LLM.GPT_35_TURBO_16K,
                                                      LLM.GPT_4,
                                                      LLM.ERNIE_Speed_128K],
                        default=LLM.ERNIE_Speed_128K)
    parser.add_argument("--start_index", type=int, default=0)
    parser.add_argument("--end_index", type=int, default=1000000)
    parser.add_argument("--temperature", type=float, default=0) # qianfan  (0, 1.0]
    parser.add_argument("--mini_index_path", type=str, default="")
    parser.add_argument("--batch_size", type=int, default=1)
    parser.add_argument("--n", type=int, default=5, help="Size of self-consistent set")
    parser.add_argument("--db_dir", type=str, default="dataset/spider/database")
注意千帆的temperature是 (0, 1.0]和gpt的还不一样
至此已经完全修改完毕。
]]>[
{
"id": "A",
"name": "农、林、牧、渔业",
"pid": null,
"level": "0",
"desc": "本门类包括 01~05 大类"
},
{
"id": "A01",
"name": "农业",
"pid": "A",
"level": "1",
"desc": "指对各种农作物的种植"
},
{
"id": "A011",
"name": "谷物种植",
"pid": "A01",
"level": "2",
"desc": "指以收获籽实为主的农作物的种植,包括稻 谷、小麦、玉米等农作物的种植和作为饲料和工业原料的谷物的种植"
},
{
"id": "A0111",
"name": "稻谷种植",
"pid": "A011",
"level": "3",
"desc": null
},
{
"id": "A0112",
"name": "小麦种植",
"pid": "A011",
"level": "3",
"desc": null
},
{
"id": "A0113",
"name": "玉米种植",
"pid": "A011",
"level": "3",
"desc": null
},
{
"id": "A0119",
"name": "其他谷物种植",
"pid": "A011",
"level": "3",
"desc": null
},
{
"id": "A012",
"name": "豆类、油料和薯类种植",
"pid": "A01",
"level": "2",
"desc": null
}
]然后将他们转换成这种形式
[
    {
        "id": "A",
        "name": "农、林、牧、渔业",
        "pid": null,
        "level": "0",
        "desc": "本门类包括 01~05 大类",
        "children": [
            {
                "id": "A01",
                "name": "农业",
                "pid": "A",
                "level": "1",
                "desc": "指对各种农作物的种植",
                "children": [
                    {
                        "id": "A011",
                        "name": "谷物种植",
                        "pid": "A01",
                        "level": "2",
                        "desc": "指以收获籽实为主的农作物的种植,包括稻 谷、小麦、玉米等农作物的种植和作为饲料和工业原料的谷物的种植",
                        "children": [
                            {
                                "id": "A0111",
                                "name": "稻谷种植",
                                "pid": "A011",
                                "level": "3",
                                "desc": null
                            },
                            {
                                "id": "A0112",
                                "name": "小麦种植",
                                "pid": "A011",
                                "level": "3",
                                "desc": null
                            }
下面是python代码
# 划分同一个数据下面的各种类别
import json

# 读取文件并解析 JSON 数据
def read_json_file(file_path):
    with open(file_path, 'r', encoding='utf-8') as file:
        data = json.load(file)
    return data

# 写入到 JSON 文件
def write_json_file(data, file_path):
    with open(file_path, 'w', encoding='utf-8') as file:
        json.dump(data, file, ensure_ascii=False, indent=4)

def build_hierarchy(categories):
    # 创建一个空的字典列表,用于存储最终结果
    result = []

    # 创建字典,用于将分类按照 id 分组
    category_map = {}
    for category in categories:
        category_map[category['id']] = category

    # 遍历分类列表,构建分类树
    for category in categories:
        # 如果当前分类的 pid 为空,则将其视为一级分类
        if category['pid'] is None:
            result.append(category)
        # 否则,将当前分类添加到其父分类的 children 列表中
        else:
            parent_id = category['pid']
            parent_category = category_map.get(parent_id)
            if parent_category is not None:
                if 'children' not in parent_category:
                    parent_category['children'] = []
                parent_category['children'].append(category)

    return result


# 读取数据
categories = read_json_file('D:\ALL_Proj\PyCharm_Proj\pythonProjectDemo01\无标题.json')
# 构建分类树
result = build_hierarchy(categories)
# 写入数据
write_json_file(result, 'D:\ALL_Proj\PyCharm_Proj\pythonProjectDemo01\Aresult.json')

print("文件写入成功")